November 5, 2013
Getting Started with Online Time Clock MTS
This guide is designed to get you up and running with Time Clock MTS within a few minutes of your first look at the system. This tutorial assumes you're logged into Online Time Clock MTS using the automatically created account administrator login.
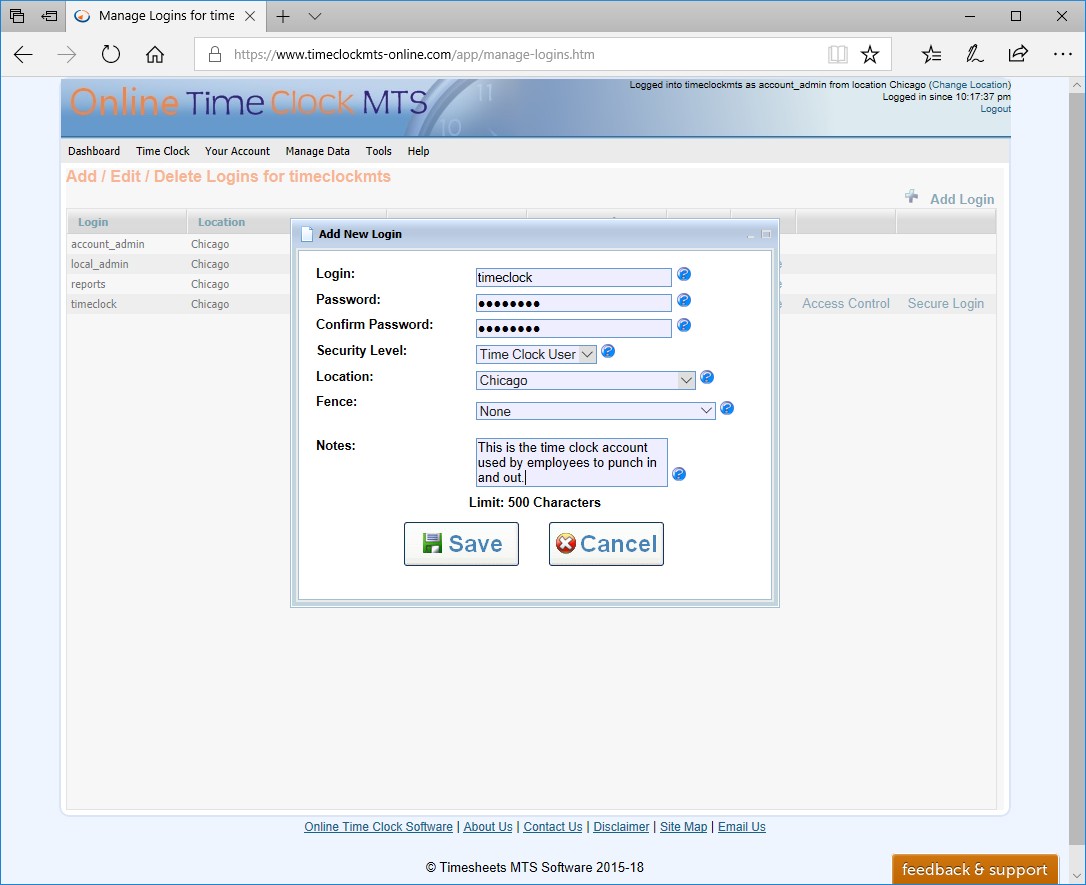
Figure 1 - Adding a Timeclock Login (Click to Enlarge)
Create a Time Clock User Login
The first step is to create a time clock user login for your employees to use. Time clock logins can only access the employee time clock screen and they are designed for regular employees to use. To create a time clock user login follow these steps:
- From the Online Time Clock MTS Dashboard click the Manage Logins icon (the padlock icon).
- On the Manage Logins screen click the Add Login link at the top right of the list of logins.
- Enter a login for your employees to use and a password. Make sure to set the security level to "Time Clock User". See the Figure 1 above for what this should look like.
- Click the Save button to save the new login.
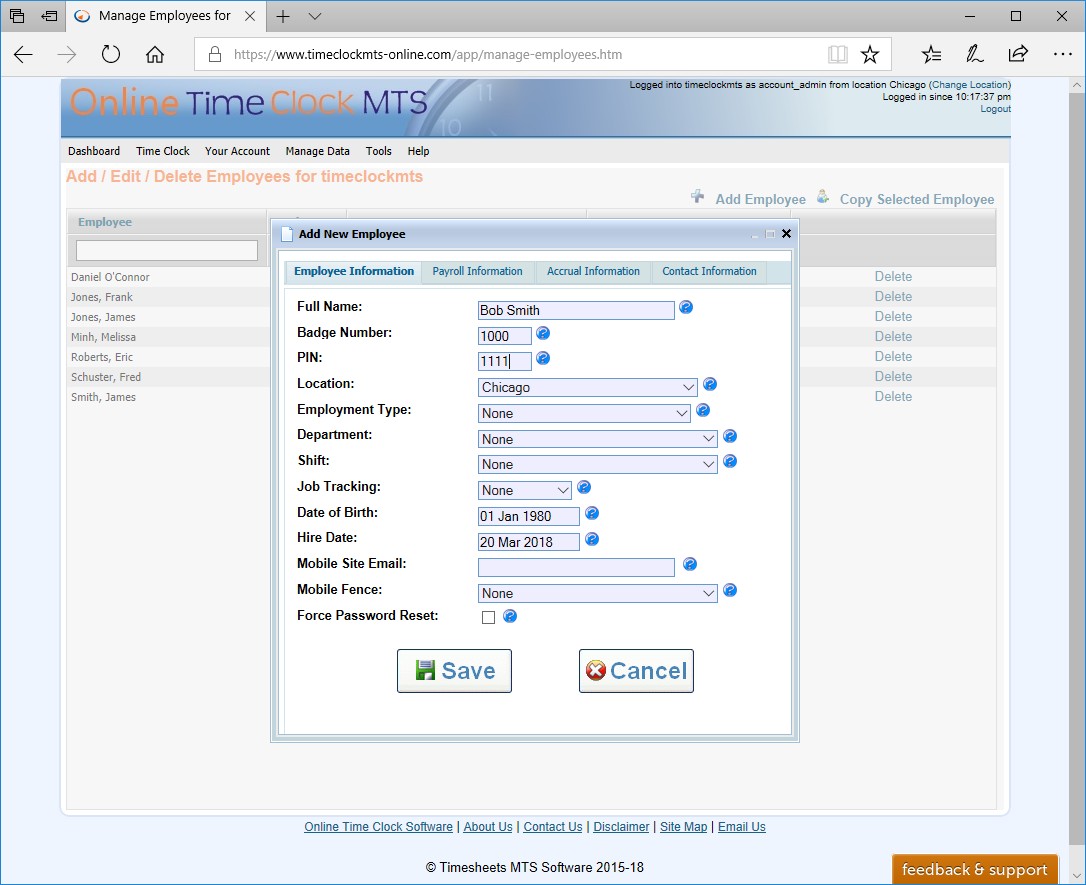
Figure 2 - Adding an Employee (Click to Enlarge)
Create Employees
The next step is to create an Online Time Clock MTS employee for each of your own employees whose time you want to track. Creating employees is simple. Just click the Dashboard menu item at the top left of the screen and then follow these steps:
- From the Online Time Clock MTS Dashboard click the Manage Employees icon (the Employee icon).
- Click the Add Employee link at the top right of the list of employees.
- Let's just enter a minimal amount of information for our new employee. All that is needed for an employee to get started is a Name, a Badge Number, and a PIN. Let's call our new employee "Bob Smith", leave the Badge Number at the suggested value, and give the employee a PIN of 1111. Once you've done all of this the screen should look something like Figure 2 above.
- Click the Save button to save the new employee.
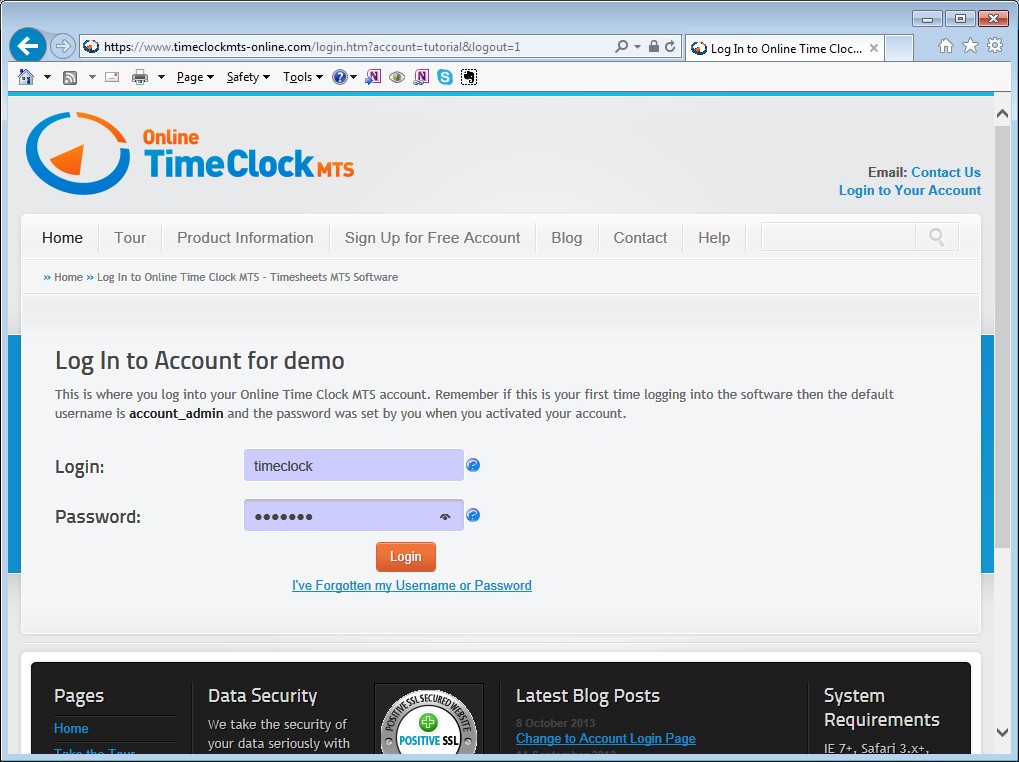
Figure 3 - Logging In (Click to Enlarge)
Log Into the New Timeclock Login
Now we're going to logout of Online Time Clock MTS by clicking the small Logout link at the top right of the screen. This will take us back to your account login page. Which will look something like Figure 3 above. Enter the login and password for the time clock user login which we entered earlier and click the Login button. If you've done everything properly you will be taken to the employee time clock showing our newly created employee (see Figure 4 below).
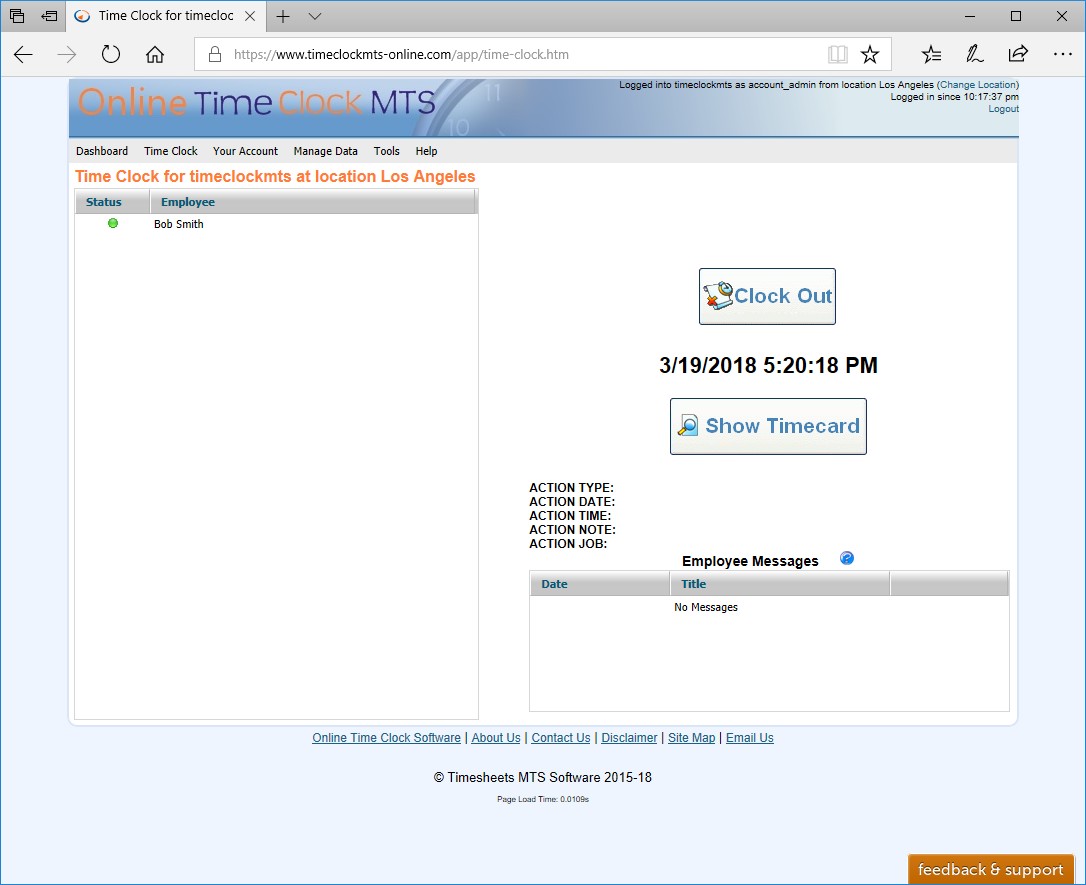
Figure 4 - The Employee Time Clock (Click to Enlarge)
Punch In and Out
Punching this employee in and out is very simple. Just follow these steps:
- Click on the employee's name in the employee list. When you do that the label on the Clock Out button should change to Clock In.
- Click the Clock In button. You'll be shown a popup where you'll need to enter the employee PIN. Remember we set this PIN to 1111. Enter the PIN and click the Enter button and you'll punch the employee in. The red status icon next to our employee should change to green indicating they are now clocked in AND the label on the button should change to Clock Out .
- Once you're happy the employee actually is clocked in click the Clock Out

Figure 5 - Logging In (Click to Enlarge)
Log in as the Account Administrator and Run Reports
The last step in this getting started tutorial is to run a report on the employee time punches we've just recorded. Because we're currently logged into a time clock user security account we cannot run any reports so we're going to need to log out and back into our Online Time Clock MTS account administrator login. Click on the Logout link again at the top right of the screen and we'll be back at the account login screen. Here we can enter our account administrator login and password (these are the same login and password you created when you first signed up for your account). When done correctly it should look something like Figure 5 above, when you're happy click the Login button and you'll be taken back to Online Time Clock MTS dashboard.
Click the Reporting icon (the clipboard icon) and when you're on the Reporting screen click the Payroll Reports icon. You'll be shown the Payroll Reports screen (see Figure 6 below).
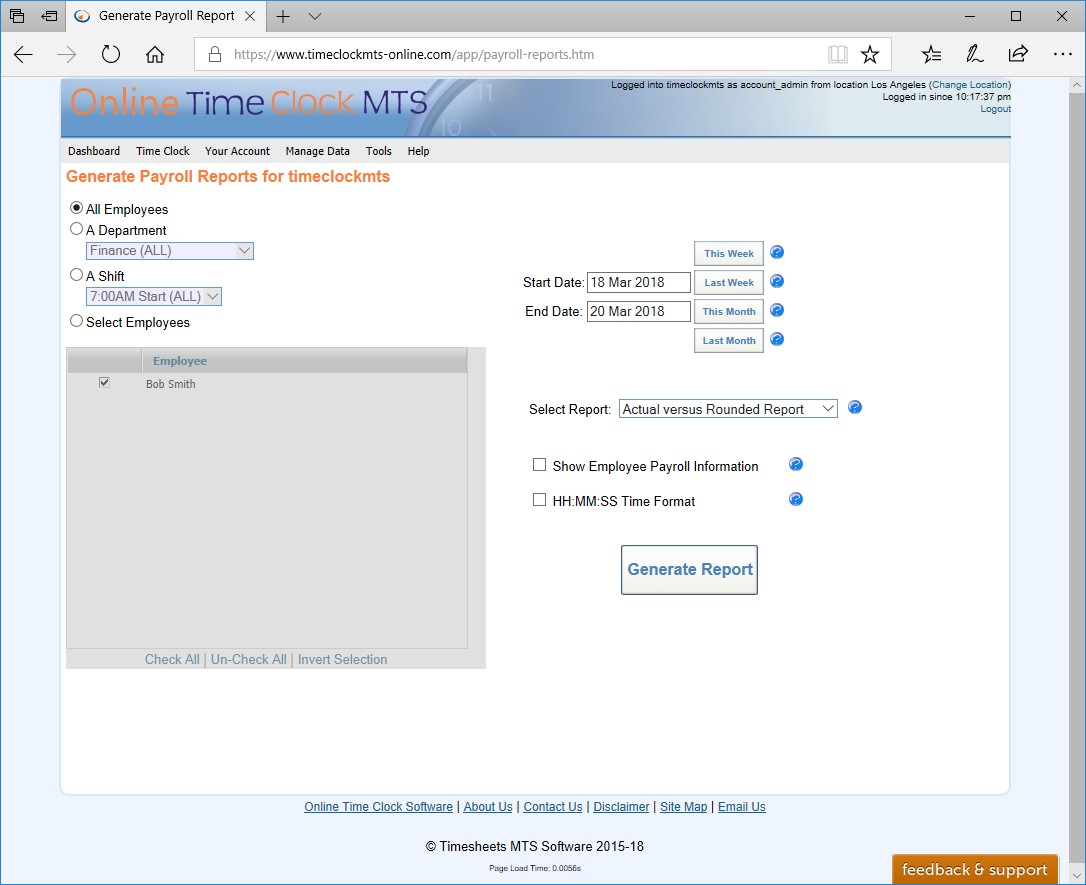
Figure 6 - The Payroll Reports Screen (Click to Enlarge)
Click the This Week button to run a report for this week and then click the Select Report dropdown and choose the Punchcard Report. When that's done we can go ahead and click the Generate Report button and the report (see Figure 7 below) will appear.
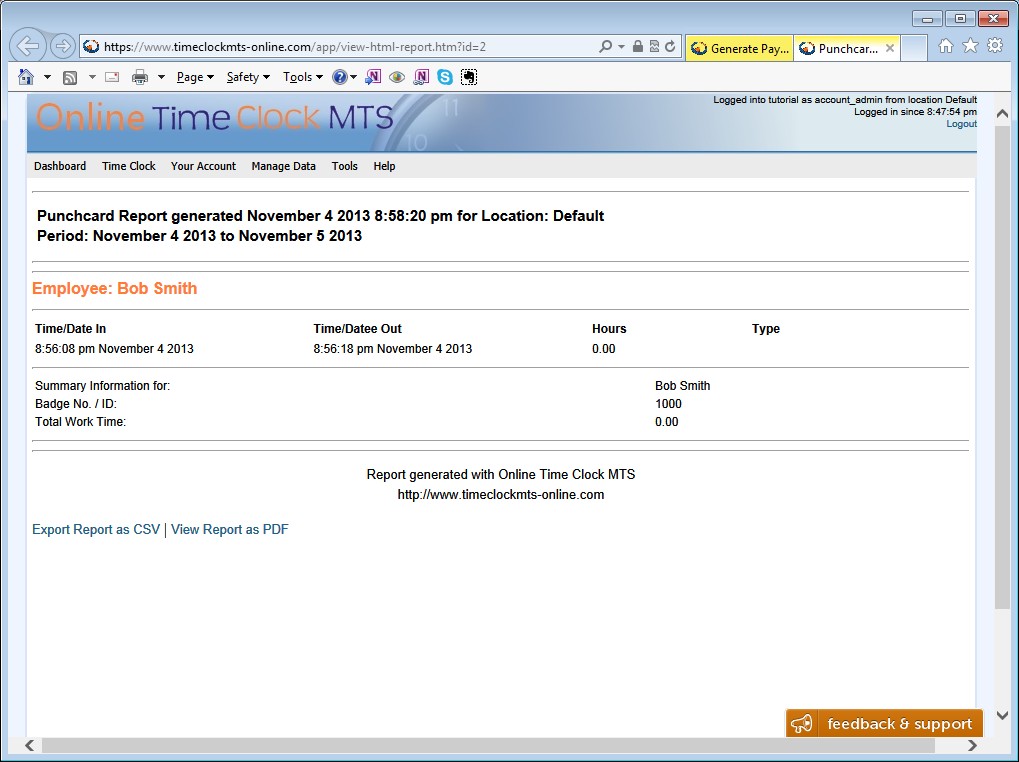
Figure 7 - The Punchcard Report (Click to Enlarge)
What Next?
The next steps are to set up Time Clock MTS to suit your payroll rules including overtime, sick time, vacation time, or report rounding. You might want to set up some different security logins such as reports login for your payroll staff. And don't forget that Online Time Clock MTS allows you to track multiple locations that can even be in different timezones.
Don't forget your employees can use the time clock on mobile devices and you can restrict what computers or devices they use by IP address or by creating GeoFences that control the geographic locations they can punch in and out from.
Posted by markn at 1:15 PM
October 8, 2013
Change to Account Login Page
I've spent the last few days streamlining the Online Time Clock MTS account sign up process and as a part of this I've made a change to the account login page. You're probably already aware that you can log into your web time clock account using your account login page using an URL something like:
https://www,timeclockmts-online.com/login/your_account_name/
Where "your_account_name" is (obviously) the name of your Online Time Clock MTS account.
Now you can include your login name into this URL to have the Login field pre-populated. So, if, for example, your account administrator login is account_admin then you could change the above URL to:
https://www,timeclockmts-online.com/login/your_account_name/account_admin/
Or perhaps you have setup a timeclock security account for your employees called "timeclock" then you'd change the URL to:
https://www,timeclockmts-online.com/login/your_account_name/timeclock/
Of course your employees will still need to enter a password to log into your time clock account.
Don't forget that timeclock security accounts can be setup with a One Click Login which won't require your employees to enter a password. If you wanted to know how to do this then you should read this One Click Login Time Clock Article.
Posted by markn at 12:16 PM
January 17, 2012
Step by Step Guide to Running Payroll Reports
This tutorial takes you through the process of generating a payroll report in Online Time Clock MTS.

The Online Time Clock MTS Dashboard - Click to Enlarge
1. Log into Online Time Clock MTS as the account administrator or as a reports user. Click on the Reporting icon.
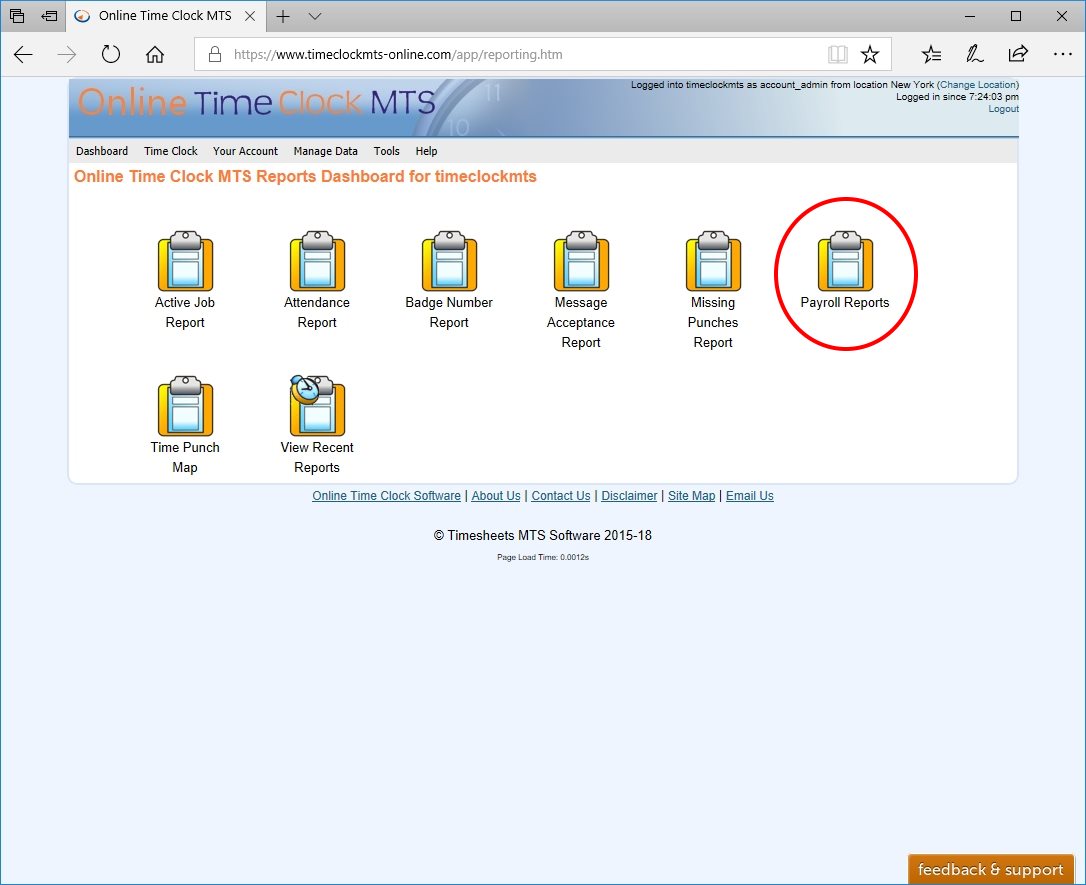
The Online Time Clock MTS Report Screen - Click to Enlarge
2. You will now be on the Online Time Clock MTS Reporting dashboard. Click on the Payroll Reports icon.
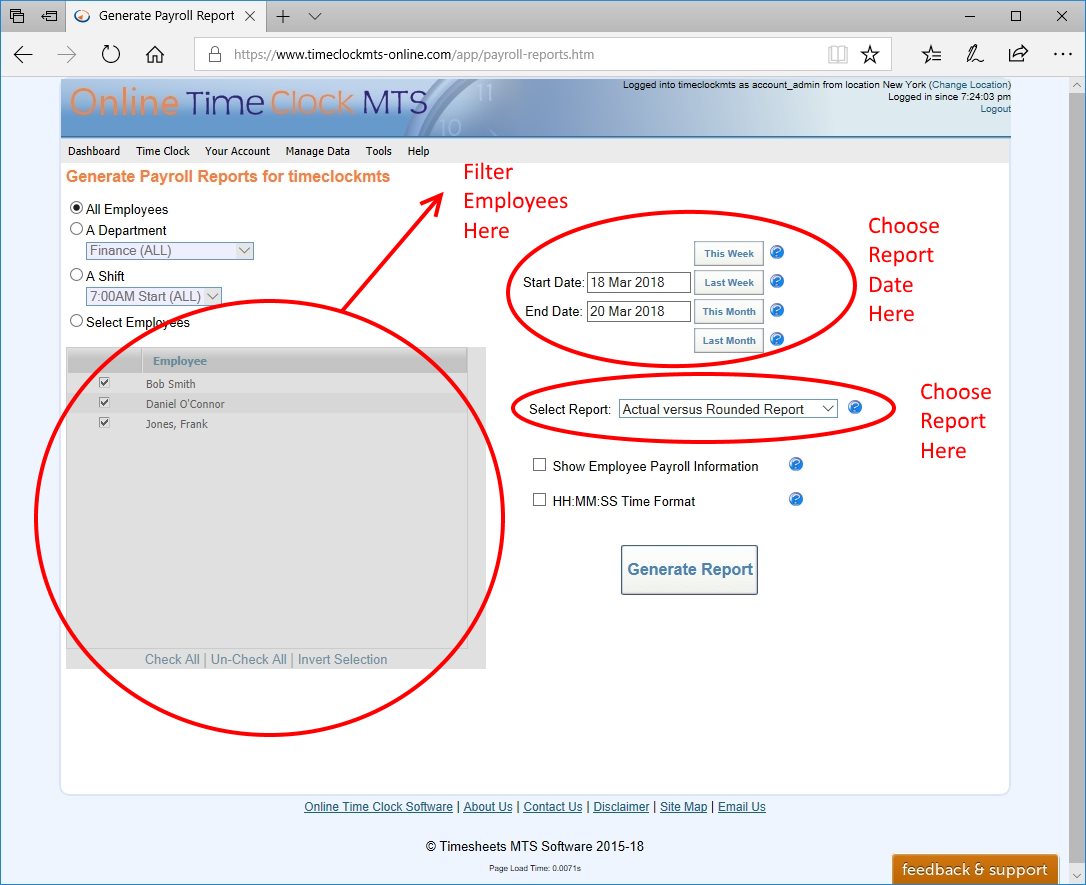
The Online Time Clock MTS Report Configuration Screen - Click to Enlarge
3. You will now be on the Online Time Clock MTS Report Configuration screen. This screen allows you to configure report parameters and then run and view a payroll report. The left hand side of the screen allows you to filter the employees that are included in the report. This could be done by department or by selecting individual employees. The top right of the screen allows you to select the report date. The middle right allows you to select what report you actually want to run. For a complete list of Online Time Clock MTS payroll reports you should take a look at the Reporting Help Topic. When you've configured the employees, report date range, and selected the report you wish to run click the Generate Report button and you'll be shown a progress indicator as your report is generated. When it's complete you'll be shown the following screen.
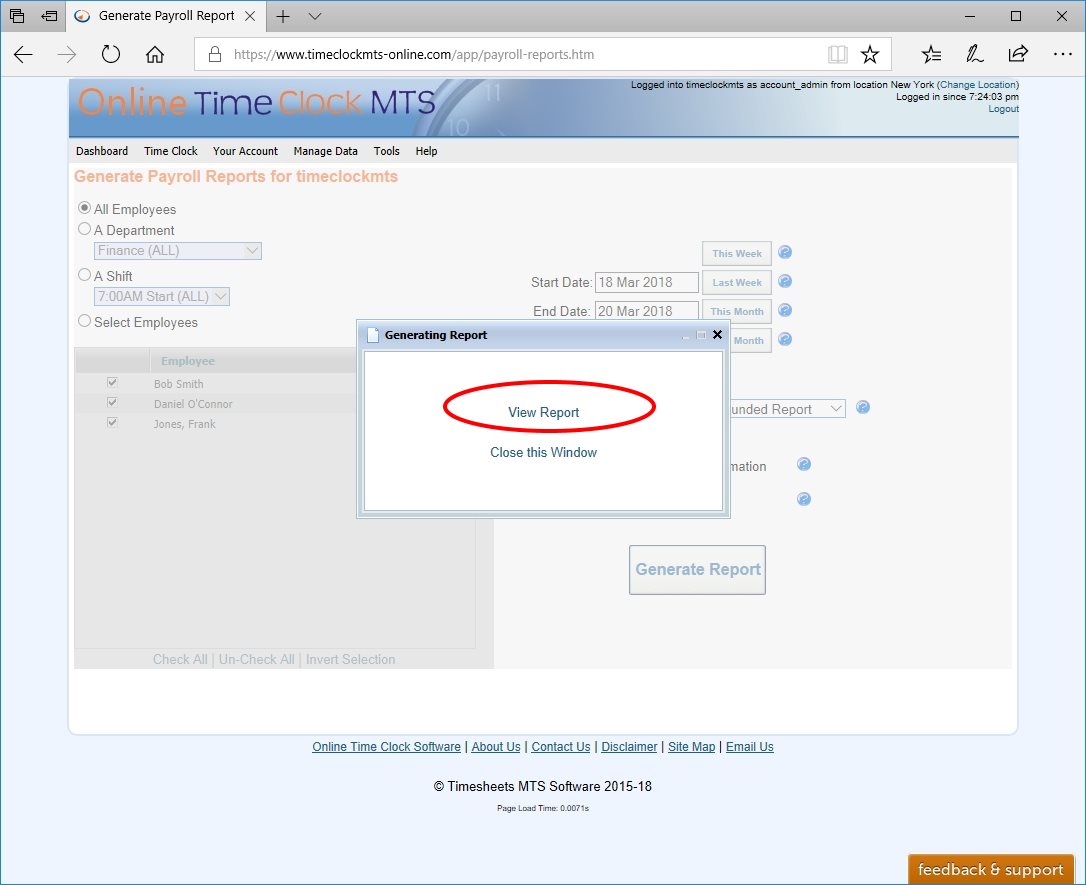
Online Time Clock MTS Report Generated - Click to Enlarge
4. Click the View Report link to view your report. For an example of a generated report you should take a look at the Punchcard Report Help Topic.
Posted by markn at 8:15 AM
December 2, 2011
Forward Entering Vacation Time
As the holiday season comes around again it's worth noting that Online Time Clock MTS allows payroll administrators to forward enter vacation time for employees by using the Edit Times screen. This can be particularly useful to remove work load from payroll staff around holiday time when the work week is interrupted.
Posted by markn at 1:18 PM
November 1, 2011
Using Online Time Clock MTS as an In/Out Board

The Attendance Report - Click to Enlarge
Most workplaces have an employee in/out board for a number of reasons. The primary one is that it allows anyone in a workplace to know where anyone else is, usually how to contact them, and if they are out of the office, when they will return. Obviously this is very useful information from a business perspective, helping the business to run more efficiently and to assist in giving good information to customers as to the whereabouts of their points of contact within a business. The other less obvious, but equally important use of an In/Out board is as a reference for which employees are on site in the case of an emergency. For example, if a workplace needs to be evacuated due to a fire then the In/Out board can be used to ensure that all employees are actually out of the building.
The biggest gripe that employees have always had about In/Out boards is the need to physically manipulate the board when entering or leaving the work place. This can be time consuming especially if the workplace is large and there's more than one entrance to the building. Typically employees get around this by ringing the (usually) harried receptionist in the front office who has to change the board along with myriad other duties.
A web based time clock system like Online Time Clock MTS presents an obvious solution to this. Integration of the In/Out functionality with another business process, in this case monitoring of employee attendance data will result in better compliance and realize efficiencies. Online Time Clock MTS has a report specifically to be used for track who is or is not at work, the Employee Attendance Report. This displays employees in two groups, those who are clocked in, and those who are clocked out along with the last employee note entered. We'd suggest if you're using Online Time Clock MTS to track your time clock data already then you should consider using it as an employee In/Out board.
Posted by markn at 9:07 AM
August 1, 2011
Importing Employees into Online Time Clock MTS
A recent update to Online Time Clock MTS added the ability to create multiple employees simultaneously by importing a CSV file containing all the settings for the employees that are to be created. There's a help topic covering importing employees but I thought it was worthwhile having a longer entry covering some of the finer points of the process that you might be interested in.

The Import Employees Screen - Click to Enlarge
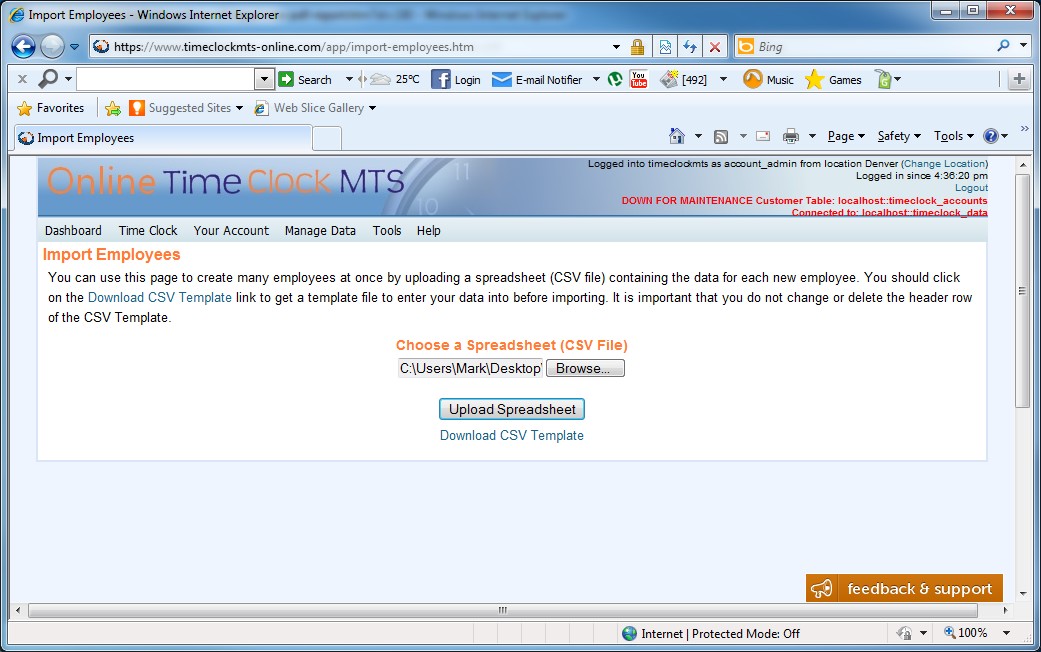
Firstly, the Import Employees screen can be seen above. It is reached from the Manage Data->Import Employees menu and is available to the Account Administrator and location administrators. The screen can be used to import a CSV (comma separated value) text file and create multiple employees from this data very quickly. It's worth noting that employees imported using this screen will be added to the Online Time Clock MTS Location that the current user is logged into.
We've tried to make creating a CSV file for importing as simple as possible and users can easily download a template file by clicking the Download CSV Template link. This will download a CSV file that (should) automatically open in your installed spreadsheet program. It's worth taking a minute to explain what a CSV file is. Basically it's a plain text file consisting of rows of values with each value separated by a comma (,) character and each row separated by a return character. Typically CSV files are edited with a spreadsheet program (like Microsoft Excel, Open Office, or even Google Docs) but they can also be edited with simple text editors like Windows Notepad. If you want to know more about CSV files you should head over to the Wikipedia entry on Comma-separated values. Let's get started with the actual import process.
The Import Employees Screen - Click to Enlarge
1. Create the CSV File
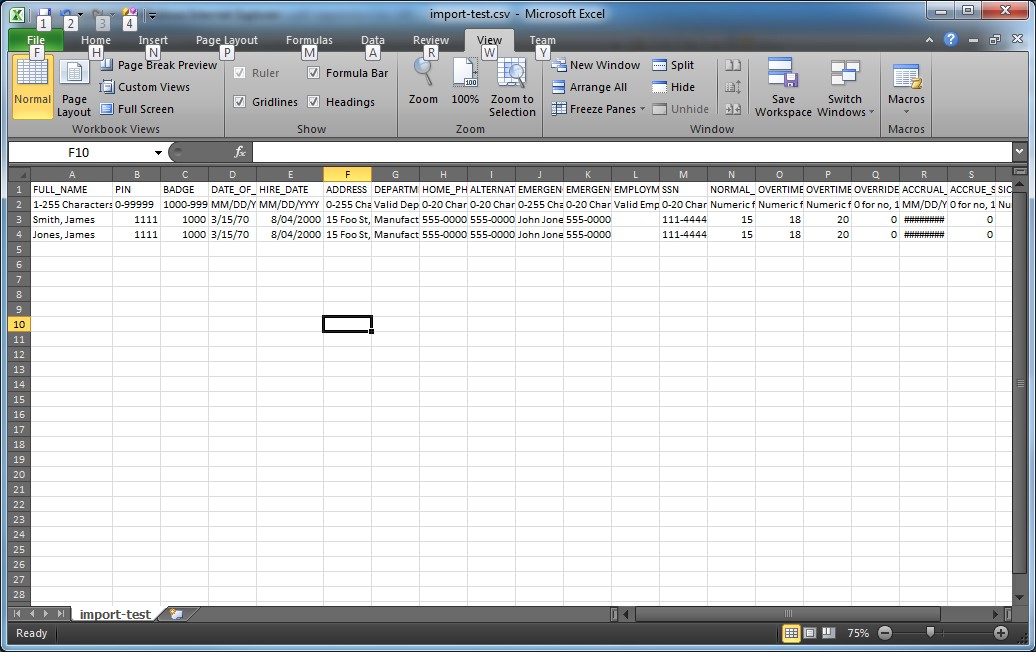
As mentioned above you should click the Download CSV Template link to download a correctly formatted template for importation to Online Time Clock MTS. When opened in your spreadsheet program it should look something like the image above. The top row is a header row and contains a name for each column with each name describing what employee setting it corresponds with. The header row should not be deleted or edited in any way. The second row includes some helpful tips on the values that should go in each column. This row can be deleted if you like or left in place, Online Time Clock MTS will ignore it during the file import process if it is left intact .
Let's take a moment to look at some of the explanatory notes on the second row and how to interpret them. The note in column 1 says "1-255 Characters". This means that the employee FULL_NAME field must be between 1 and 255 characters long. If you do not fill in this field correctly the entire row for that employee will be ignored during the import process. Other columns include notes like 'Numeric'. These require numbers to be entered into them, typically if you fail to put a numeric value in these fields then those values will default to zero (0). Another column type of interest is the date time format columns (for hire date and date of birth for example). These require a date entered of the format MM/DD/YYYY. An invalid value here will result in that setting default to the current date.
The fields DEPARTMENT and EMPLOYMENT_TYPE allow you to enter names of existing departments and employment types into them. If you do not enter the EXACT name of an existing department or employment type then these settings will default to no assigned department or employment type.
In the CSV file above I've entered details for two new employees. If there are already employees with the same full name defined in Online Time Clock MTS then those rows will be ignored during the importation process. Once the data is entered the way you like it you can save the CSV file onto your computer (making sure to keep it in CSV format).
The Import Employees Screen - Click to Enlarge
2. Select the CSV File
The next step is to actually import the CSV file. To do this you must first select the file you want to upload to the Online Time Clock MTS servers. Do this by clicking on the Browse button. You might find that this button has a different label on it in some browsers. Once you've done this a file explorer dialog will popup allowing you to navigate to your CSV file and then select it. Once you've selected it the path to the file should be shown next to the Browse button. Now we're ready to upload the CSV file and create the new employees. This is done by clicking the Upload Spreadsheet button.

The Import Employees Screen - Click to Enlarge
3. Upload the CSV File
Once you've clicked the Upload Spreadsheet button for your selected CSV file Online Time Clock MTS will upload and process the file. Any files with a missing header row, a modified header row, or files of the wrong format completely will be ignored and a status message will inform you of the fact. If the file format is OK then Online Time Clock MTS will process it row by row and give a result for each row. In the example above you can see that the file was uploaded successfully and two new employee records were created. When there is a problem with the data in a row that prevents an employee being created a message will be displayed telling what the problem is and what row in the CSV file the contains the problem.
As an extra safety feature Online Time Clock MTS will not import new employees with the same name as an existing employee. We do this because we don't want you to create duplicates if you happen to accidentally import the same file twice. One huge advantage of this is that if you have a problem with one row in your CSV file the first time you import it then you can fix up that row and import the whole file again and the employees you created the first time will not be re-created.
Normal subscription limits apply when you're using the Import Employees screen to create new employees. So if your current Online Time Clock MTS subscription is good for 10 employees then the Import Employees screen will not allow you to create employees beyond this point.
Conclusions
The Import Employees screen is a great way of creating multiple employees in just a few minutes. While you can pretty easily copy employees on the Manage Employees importing employees via CSV files is clearly a lot faster and potentially a lot more flexible. We hope you find it useful!
Posted by markn at 9:44 AM
June 17, 2011
Online Time Clock MTS and Payroll Time Rounding
The Display and Report Settings Tab - Click to Enlarge
One of the more common questions I've got in the last few months is from people wondering exactly how Online Time Clock MTS handles payroll time rounding. So here's a quick run through on time rounding in Online Time Clock MTS.
Turning Time Rounding On
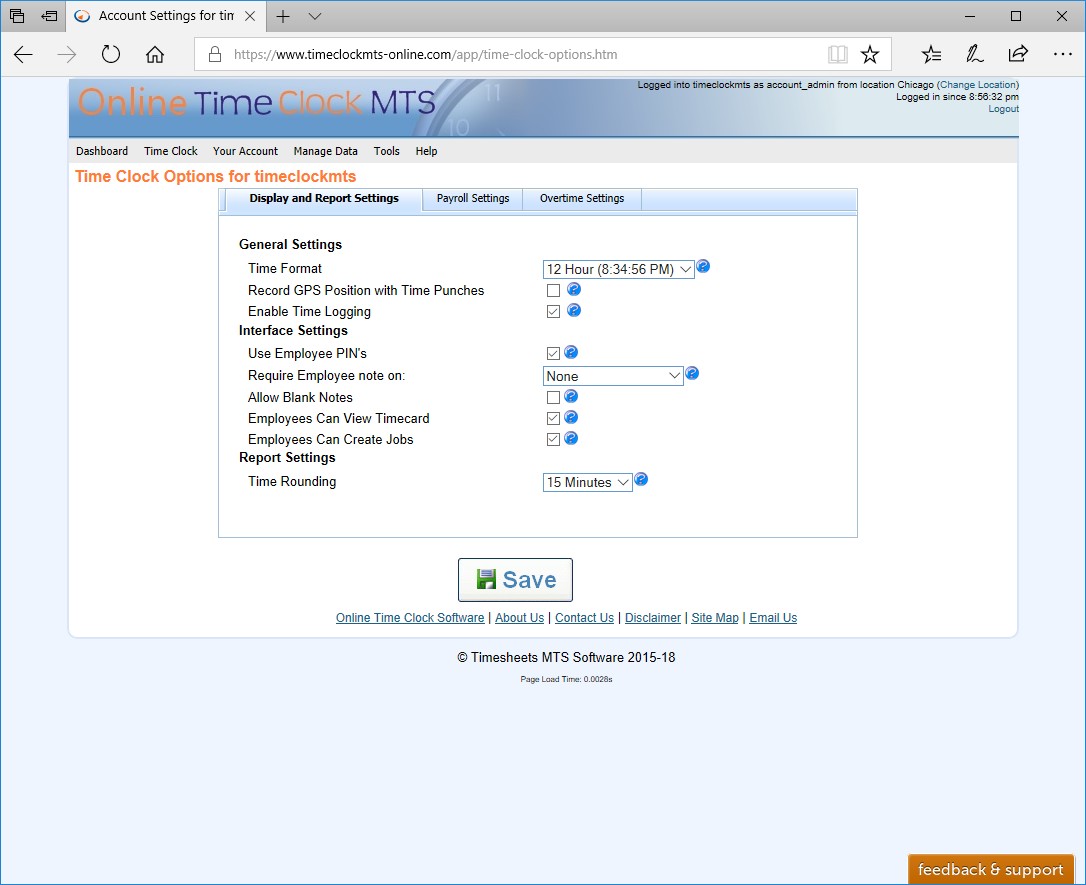
Time rounding is turned on by the Online Time Clock MTS account administrator on the Tools->Time Clock Options->Display and Report Settings page. Select a value from the Time Rounding drop down box of 6, 15, or 30 minutes. If you do not want to use report time rounding then leave the selection at None.
How Exactly Does the Rounding Work?
If you've got Time Rounding turned on then Online Time Clock MTS will round times at report time only. These rounded values will be used to calculate all time totals and payroll figures at report time too.
The rounding method used by Online Time Clock MTS is just normal arithmetic rounding. Let's consider an example where the time rounding interval is set to 15 minutes and your typical employee clock in time is 8:30:00AM. Any clock in before 8:37:30AM will be rounded down to 8:30:00AM. Any clock in on or after 8:37:30AM will be rounded up to 8:45:00AM.
Does Rounding Affect the Stored Time Data
No it most definitely does not. Rounding calculations are applied at report time only. The actual raw clock in and out times are still stored by Online Time Clock MTS accurate to the second that they were initially recorded. If you wanted to check this you could just turn off time rounding temporarily and run your reports and you'll see all of the un-rounded data in the report.
Why Time Rounding Might Be Used
The first and most obvious reason is that Time Rounding just makes things simpler and easier to understand. Time Rounding could also be used in your workplace to comply with either your particular workplace payroll rules or perhaps to adhere to government payroll regulations. It might be used to implement a minimum overtime rule and prevent employees accumulating tiny amounts of overtime by clocking in fractionally too early or clocking out a little too late. It also gives your workplace some flexibility with clock in times, if you've got multiple employees they obviously cannot all clock in at once nor can the punch out all at the same time. Some localities allow for this sort of rounding in the work place.
A Warning
Payroll rounding should always be used with caution and you should check with your local regulators to make sure that it is legal.
Posted by markn at 11:04 AM
June 7, 2011
Log In to Time Clock Account via Shortcut
I've just uploaded a new feature to Online Time Clock MTS that will allow your time clock security level accounts to login without the need for a password from a single link. You can read more about it in the Single Click Secure Login help topic but in the interests of getting up and running quickly I'll give quick run through on the process here.
1. Login to Online Time Clock MTS as the account administrator or a location administrator.
2. Navigate to the Manage Logins screen.
3. Next to your time clock security level logins there is a new link called Secure Login. Click this link.

The Single Click Secure Login Link Screen
4. You'll be shown the screen above. Right click on the Secure Login Link link and copy the link (which might be done via a right click menu option like Copy Shortcut, or Copy Link Location, or Copy Link Address).
5. Paste the link address somewhere for distribution. This could be into an email, to your desktop to create a shortcut that could then be emailed, or perhaps you could save it to your bookmarks. Other options might include putting the link on your company intranet or distributing it via SMS to your employees with smartphones.
6. Make sure to take all of the suggested precautions in the Single Click Secure Login help topic before you make use of this feature.
I'll be writing some more detailed tutorials on making use of this new feature in the coming days. This will include the process for emailing the link to others and the process for creating a desktop shortcut that can be clicked. Until then if you have any questions please don't hesitate to contact us.
Posted by markn at 1:03 PM
May 11, 2011
Setting Up Job Tracking in Online Time Clock MTS
This guide is designed to take Online Time Clock MTS users through the process of setting up job tracking and then having their employees record their time against jobs as they clock in and out.
The Manage Jobs Screen - Click to Enlarge
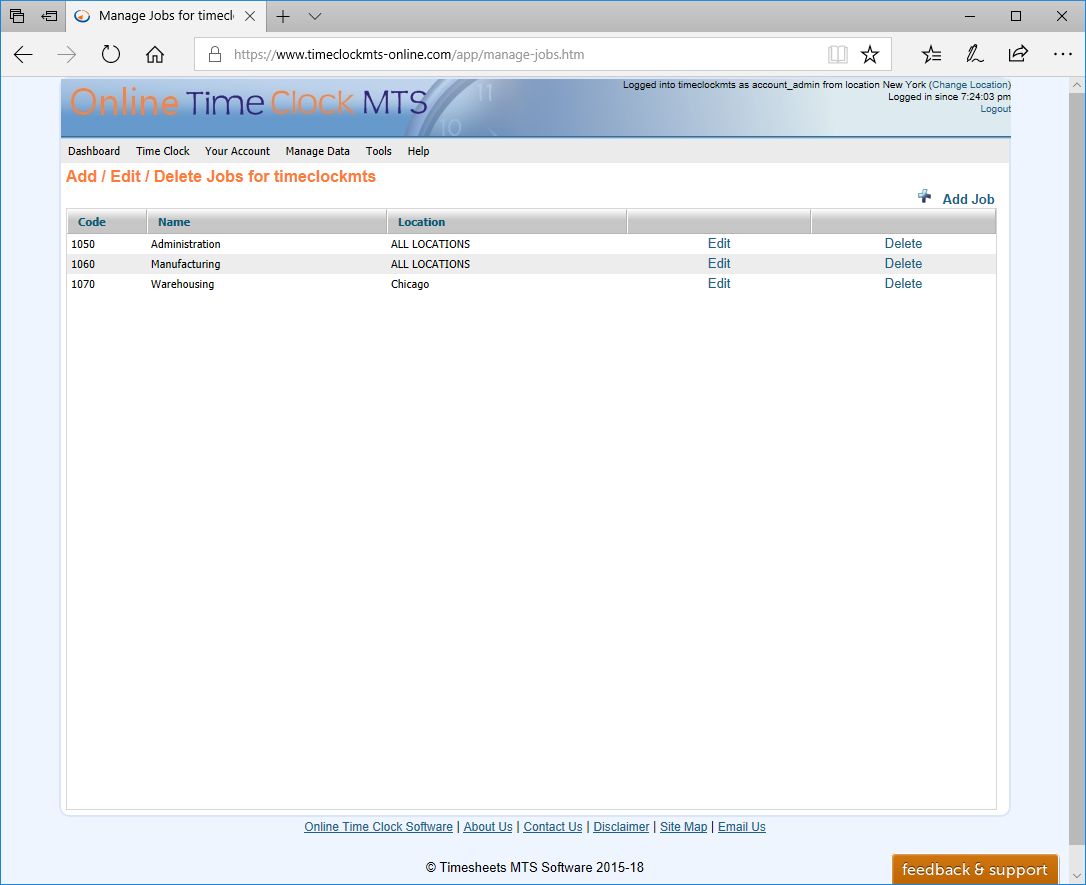
Step 1 : Create Jobs
Jobs are created on the Manage Data -> Manage Jobs screen (shown above). The Online Time Clock MTS administrator and location administrators can create jobs. Each job must have a unique numeric code which is used by employees when they clock in to tell the system that they wish to book their time against that job. Jobs can be assigned to a particular location or global across all account locations. Employees from a location can only book time to jobs assigned specifically to that location or to global jobs.
The Edit Employee Screen - Click to Enlarge
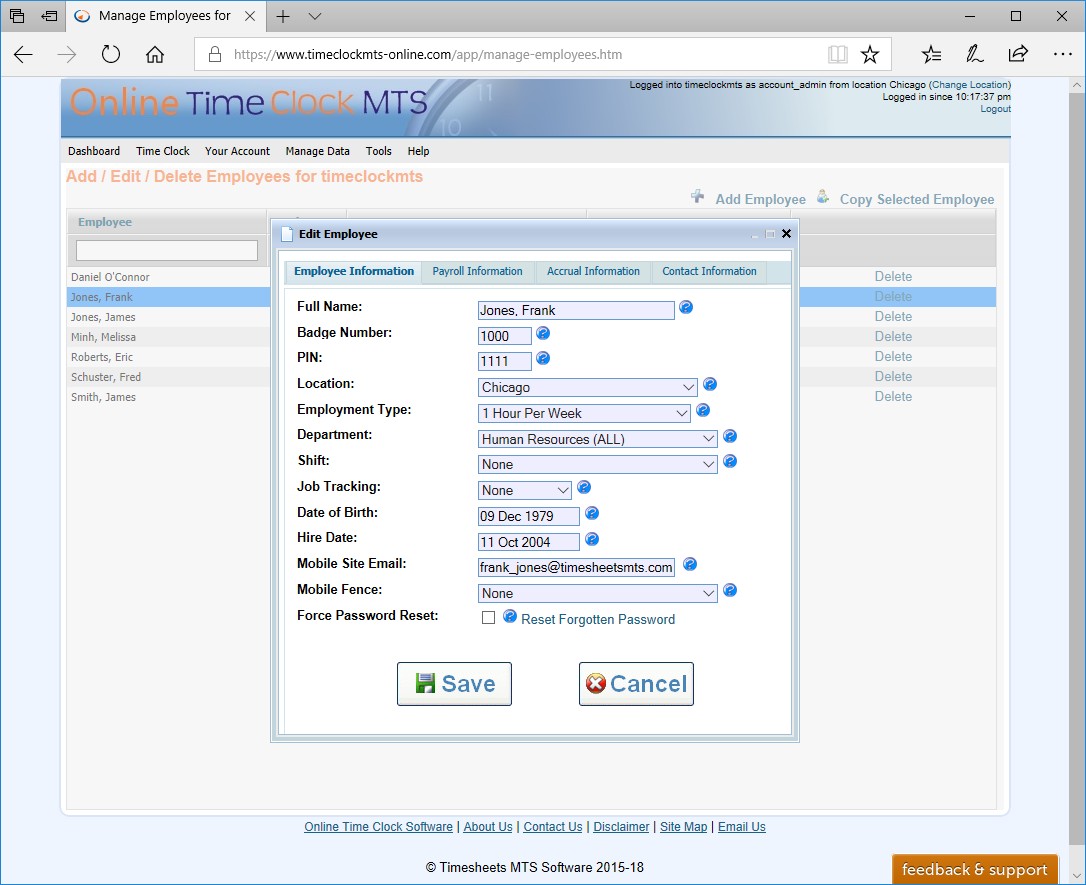
Step 2: Setup Employee Job Tracking Requirements
The next step is to define your job tracking requirements for employees. This is done on the Manage Data -> Manage Employees -> Employee Information screen (shown above). The tracking requirements are set on the Job Tracking dropdown. An employee can be excluded from job tracking by selecting "none" from this field, can optionally enter a job code by selecting "optional", or can be forced to enter a job code when "compulsory" is selected.

Entering a Job Code - Click to Enlarge
Step 3: Employee Job Tracking
Having your employees record the job they need to allocate their time against couldn't be any simpler. Just have them clock into Online Time Clock MTS as normal. If you have assigned job tracking requirements to them (in Step 2 above) then they'll be asked to enter a job code when they clock in. This screen can be seen above. If the employee enters a valid job code then the time will be recorded against that job.
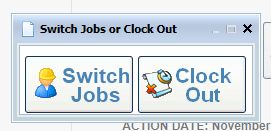
The Switch Jobs Window
Switching jobs during the day is very simple too. Just have your employee clock out from Online Time Clock MTS. They'll then be shown the "Switch Jobs" window (seen above). If they click the Switch Jobs button they can then enter a new job code and the employee will be clocked out of the old job and into the new one instantly! If your employee needs to clock out for the day then they have to click the "Clock Out" button on the Switch Jobs window.
Step 4: Run Job Reports
Currently Online Time Clock MTS provides three job based reports. The Active Job Report prints out all active jobs for the current location. It would be useful to print this report out and place it next to your time clock computers so that your employees know what job codes to use during the day.
The Job Punchcard Report breaks down the time worked by employees on a job by job basis. It also displays time not worked on jobs during the reporting period. The report then presents the total time worked on each job (and not worked on jobs) for that employee.
The Job Time Report gives managers the total time worked on each job across the reporting period. It also breaks this total down into the total time worked on the job by each employee.
Posted by markn at 10:34 AM
Some Browsers Displaying Old Versions of System
Some users are reporting problems that are due to their browsers displaying cached (and out of date) versions of Online Time Clock MTS files. To force a reload of a page (and a reload of the all files it refers to) can be slightly different depending on the browser you are using. The key combination will be CTRL-F5 or SHIFT-F5. Try searching your browser help file for more help.
Once you've done this you should see that Online Time Clock MTS displays correctly.
Posted by markn at 7:01 AM
March 30, 2011
Restoring Deleted Employees
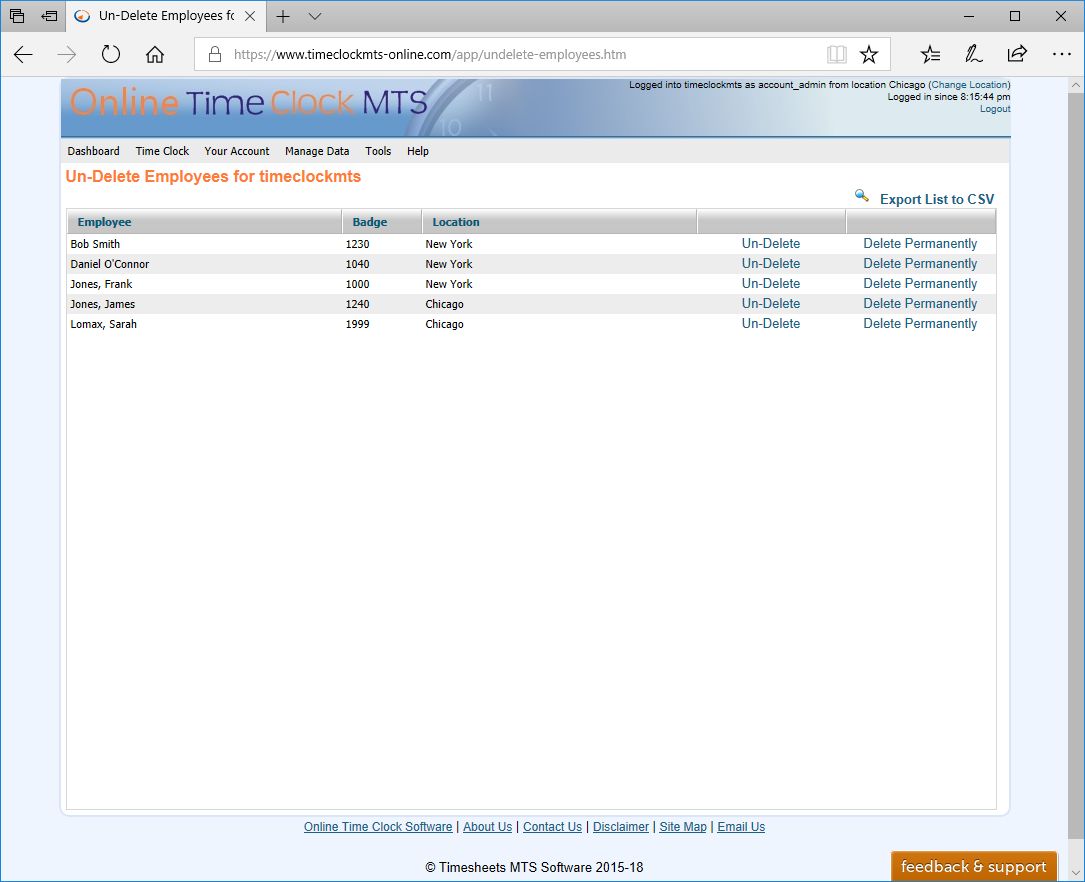
The Un-Delete Employees Screen - Click to Enlarge
We've just added a new screen to Online Time Clock MTS that allows the account administrator and location administrator to restore deleted employees. This might be because your company has re-hired the employee, because you forgot to run the last payroll report for the employee, or perhaps because you need to re-run payroll reports come tax time. Be aware that you wont be able to restore a deleted employee if the total number of employees would exceed your subscription limits.
As always if you've got any questions please feel free to Contact Us.
Posted by markn at 4:00 PM
February 25, 2011
How to Send a Message to All Online Time Clock MTS Employees
It's very simple for the Online Time Clock MTS Account Administrator to send a message to all employees that are using the the system. This blog entry takes you through the process.
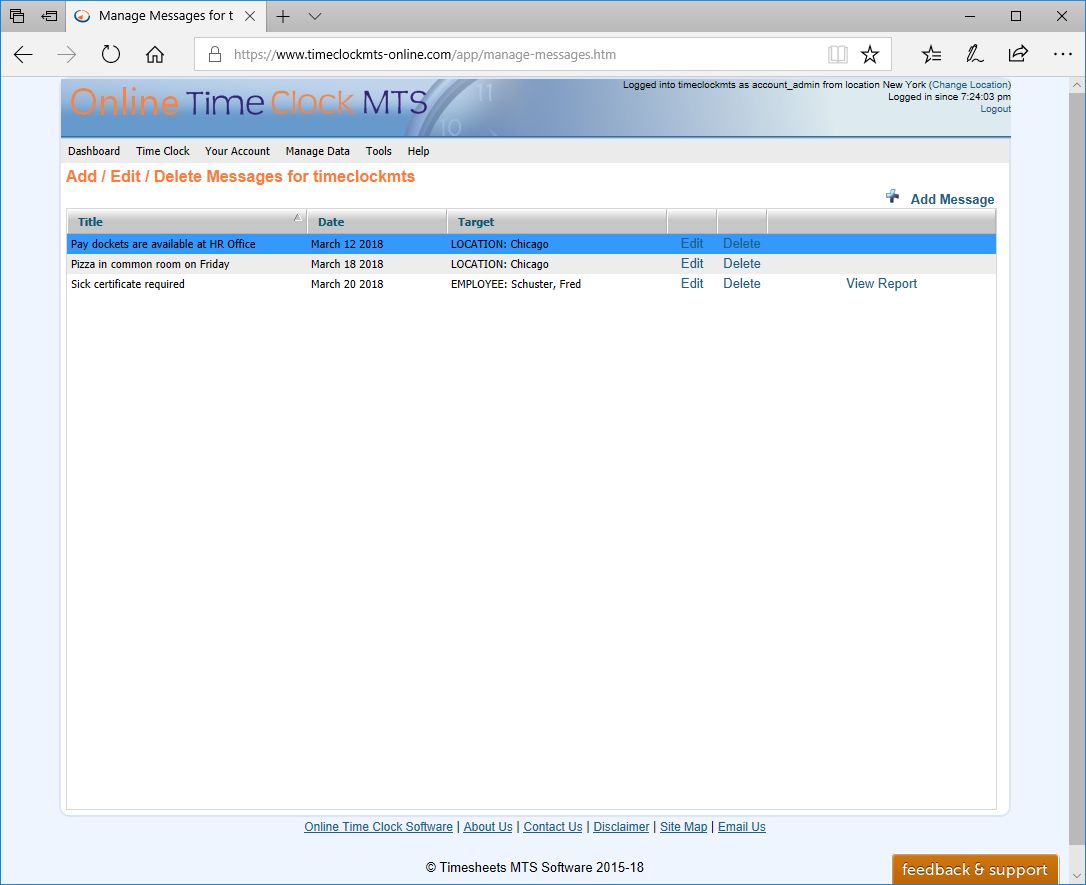
Manage Messages - Click to Enlarge
1. Log in as the Account Administrator and go to the Manage Data->Manage Messages screen. You can see this screen above.
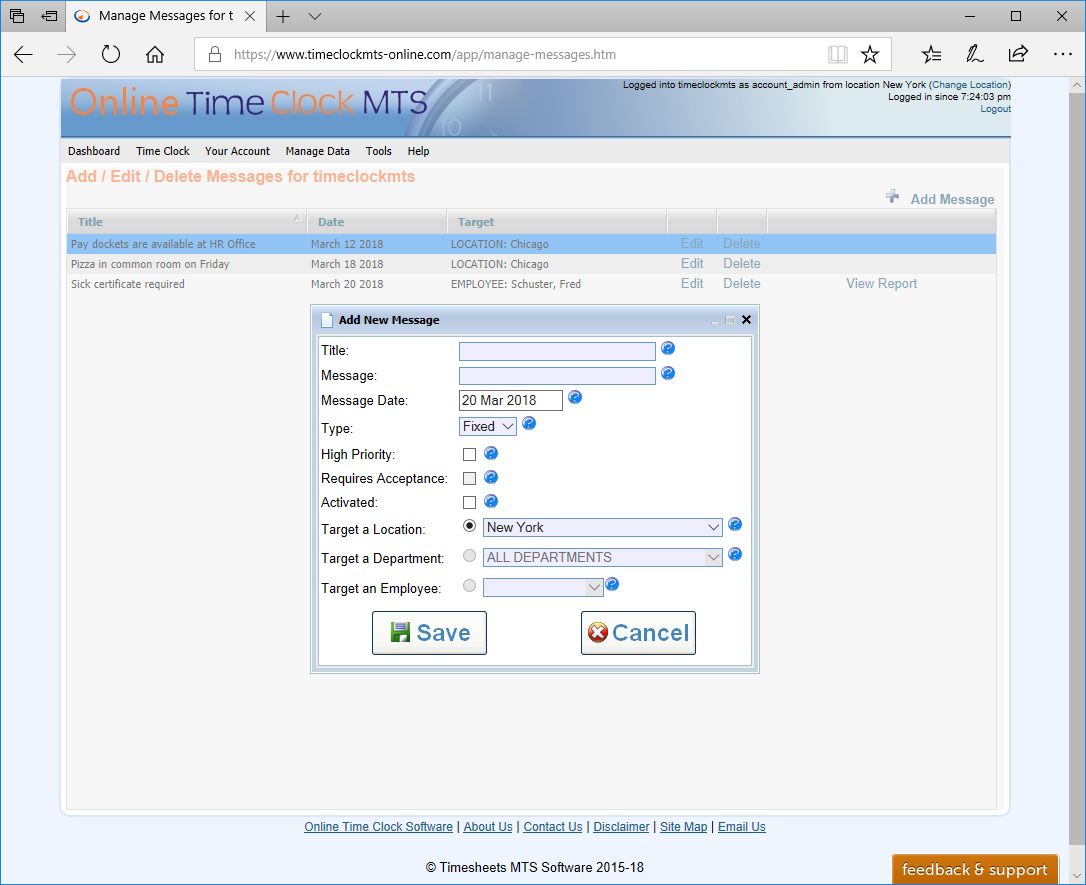
The Add New Message Screen - Click to Enlarge
2. Click the New Message Link and you'll be shown the Add New Message screen (seen above).
3. Enter the message details you require, making sure to enter a meaningful message title and to check the Activated check box.
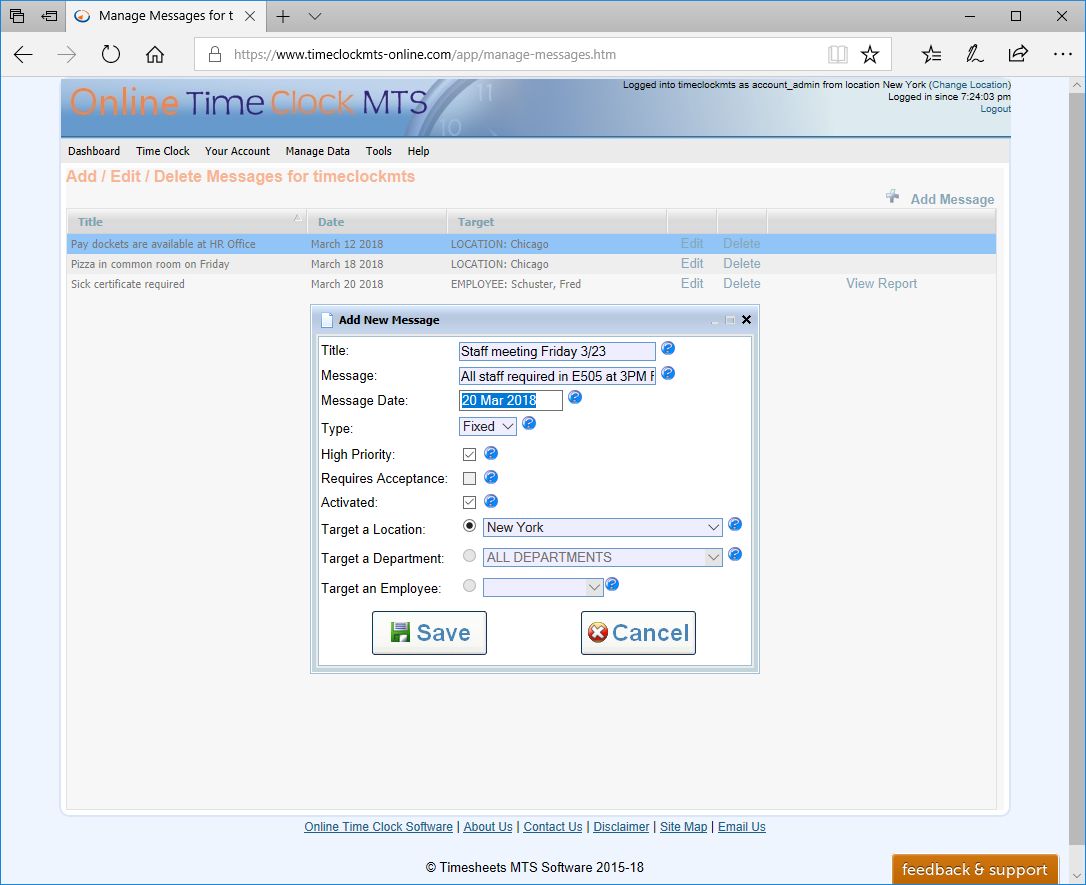
The Add New Message Screen - Click to Enlarge
4. Set the Message Type to Fixed and the Target a Location dropdown to ALL LOCATIONS. The Add New Message screen should now look something like the image above.
5. Click the Save button to save the new message.
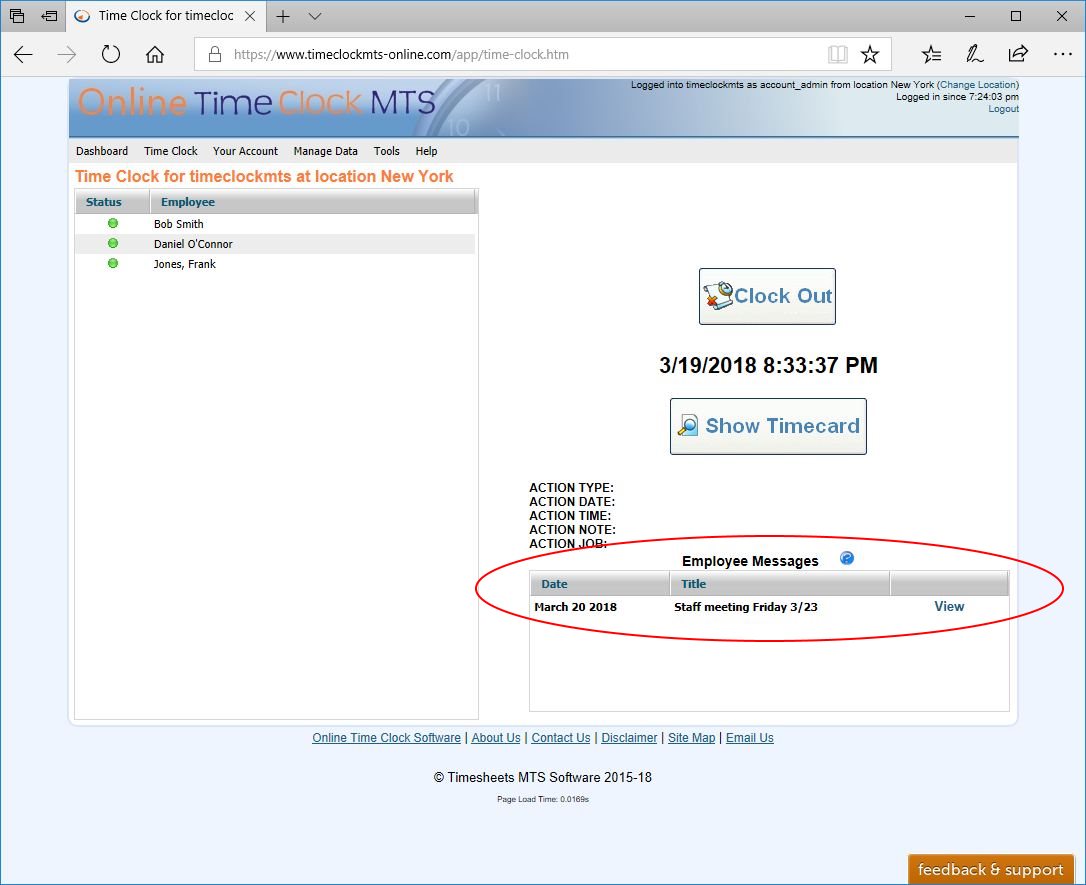
The Employee Time Clock Screen - Click to Enlarge
6. Click the Time Clock dropdown menu on the Online Time Clock MTS toolbar to go to the online employee time clock screen and you'll see the new message on the bottom right (see the image above).
As you can see it's a fairly simple process to send a message to all Online Time Clock MTS employees. You can easily vary the target of a message to send messages to all employees at a single Location, from a single Department, or even at a single employee. If you want more information try taking a look at the Manage Messages Help Topic.
Posted by markn at 9:09 AM
November 12, 2010
Online Time Clock MTS and Employees with Existing Accrual Balances
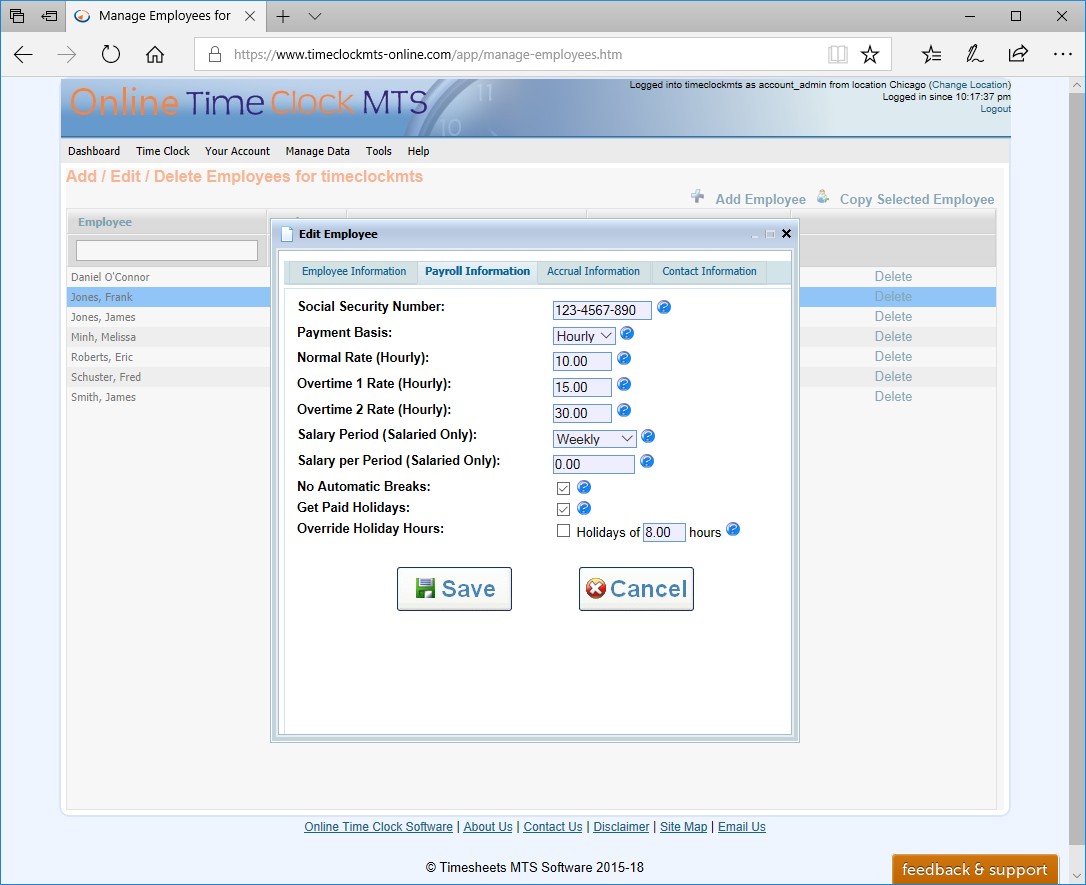
Employee Payroll Information - Click to Enlarge
If you're new to Online Time Clock MTS then you're almost certainly going to be bringing employees into the system that have existing accrual balances. This can be tricky to deal with in some systems but in Online Time Clock MTS it's actually quite simple. Above you can see the Employee Payroll Information screen. There's a few settings here which makes the job of bringing employees with existing sick time and vacation balances into the system run smoothly. We'll examine these with reference to an example. The example is an employee that has 32 hours of sick and vacation time owing as of 1 November 2010 and accrues 40 hours of sick and vacation time per year on the anniversary of their hire date. The employee hire date was 3 March 2006.
| Setting | Description |
| Override Accrual Start Date | Check this box and set the override start date to 3 March 2010. |
| Sick Time Starting Balance | Set this to 32 hours. |
| Vacation Time Starting Balance | Set this to 32 hours. |
The net result of this is that the employee will have 32 hours of accrual 'spend' available and if you've got your yearly accrual scheme configured correctly they'll be credited with another 40 hours on the anniversary of the override accrual start date.
So that's all there is to it. A similar method can be used to configure employees with accrual balances who accrue by the hour or week. If you've got a particular example you'd like explored please Contact Me and I'll put it up here on the blog as an example for other readers.
Posted by markn at 12:57 PM
What to do When an Employee Forgets to Clock In or Out
It's fairly common for employees to either forget to clock in at the start of the work day or to forget to clock out at then end of the day. Therefore, it is pretty important for your Online Time Clock MTS account administrator or your location administrators to understand what to do when this happens. It's actually pretty simple regardless of what's happened. Below are a few different scenarios you might encounter and how to deal with them. In each case you'll need to be logged into Online Time Clock MTS as the account administrator or a location administrator and then go to the Edit Times screen.
Employee Forgets to Clock In
- Select the employee from the Edit Times employee list.
- Click the Add New Time link.
- Set an appropriate clock in time and date in the Add New Time window that will popup and set the clock out day to "Not Set" and click the Save button to add the time.
- You should now see a new time in the employee times list with a clock in time only. Your employee can now clock out as normal at the end of the day.
Employee Forgets to Clock Out
- Select the employee from the Edit Times employee list.
- Look for the time in the employee time list that has a clock in time only and click the Edit link for that time.
- Set an appropriate clock out time and date in the Edit Time popup window and click the Save button to save the time.
- You should now see that the time has a clock out time on the list of employee times. Your employee can now clock in as normal the next day.
Employee Forgets to Clock In and Then Clocks In and Out at the End of the Day
- Select the employee from the Edit Times employee list.
- Look for the time in the employee time list that has a clock in time and clock out that are almost the same time as the end of the work day and click the Edit link for that time.
- Set an appropriate clock in time and date in the Edit Time popup window and click the Save button to save the time.
- You should now see that the time has sensible clock in and out times. Your employee can now clock in as normal at the next day.
Employee Forgets to Clock Out and Then Clocks Out and In the Next Day
- Select the employee from the Edit Times employee list.
- Look for the time in the employee time list that has a clock in time on one day and the clock out that extends across to the next day and click the Edit link for that time.
- Set an appropriate clock out time and date in the Edit Time popup window and click the Save button to save the time.
- You should now see that the time has sensible clock in and out times. Your employee can now clock out as normal at the end of the day.
Posted by markn at 12:16 PM
Yearly Accruals in Online Time Clock MTS
One of the more common vacation accrual policies (and sick time for that matter) is to give employees a set amount of vacation time upon the first anniversary of their hire date and then credit them with an amount each year after that. Typically these are known as 'yearly accruals' and it's an important requirement that an online time clock system to be able to account for these yearly accruals. Setting up this sort of policy in Online Time Clock MTS is a pretty simple task and this blog entry will take you through the process of doing so.
Here's what to do:
- Log into Online Time Clock MTS as the account administrator or a location administrator and go to the Managing Employment Types screen.
- Add a new employment type (this is described fully in the Setting Up Vacation Accruals blog entry) and go to the Vacation Accruals tab of the Add Employment Type Screen.
- Go ahead and enter the vacation accrual settings as shown in the image below.
- Save your new employment type and then assign all of your employees to this new type on the Manage Employees screen.

Yearly Accrual Example - Click to Enlarge
It's worth a minute to look at the settings of the yearly accrual policy we've defined above so that we understand each of the settings.
- Of course you need to make sure to check the Accrues Vacation Time checkbox.
- If you want to credit your employees with their accrual allocation in advance then enter a number in the Starts With box. If not, leave this set to zero.
- The value in the Accrue should be set to the yearly accrual amount. In this case we've set it to 40 hours.
- Set the For Every setting to 12 months.
- Ensure that you've checked the Use Hire Date not Fiscal Year checkbox so that your employees are credited with their vacation time on the anniversary of their hire date.
That's all there is too it. Yearly accruals are easy to setup in Online Time Clock MTS and they allow you a good deal of flexibility with your accrual policies.
Posted by markn at 11:18 AM
November 11, 2010
Recording Sick Time, Vacation Time and Paid Time Off
In a couple of previous blog entries I spoke about Vacation Accruals and Sick Time Accruals in Online Time Clock MTS. In this entry I'll talk about how the Online Time Clock MTS administrator can record these employee times. It's worth a quick note that you can also use the method described here to record times classified as PTO (paid time off) and Other (for utility purposes).
The Edit Times Screen
It is important to realize that all vacation and sick time is recorded by the Online Time Clock MTS account administrator or a location administrator. This means that the times must be added on the Edit Times screen which you can see below.
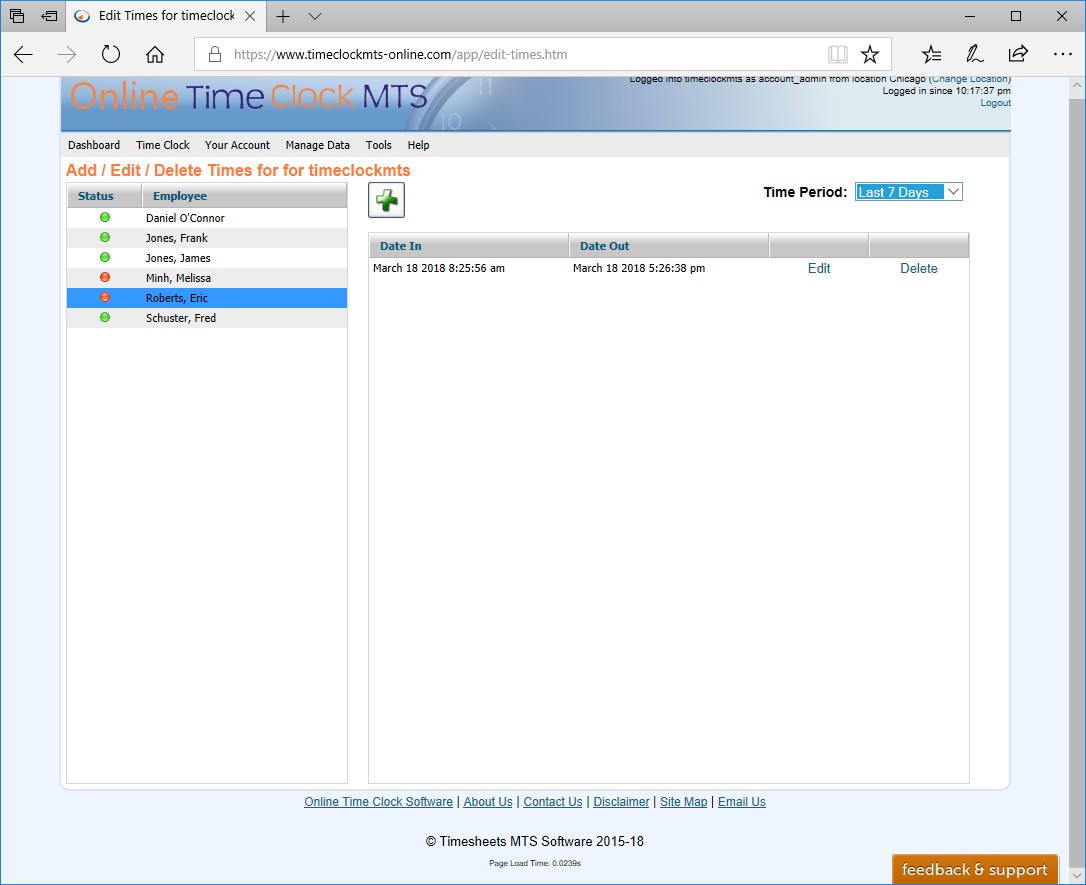
The Edit Times Screen - Click to Enlarge
This screen is pretty simple to understand. There's a list of employees down the left which can be selected and when one is clicked the employees times for the selected time range (at the top right) is displayed in the time list. If you want to learn more about how to use this screen you should take a look at the Edit Times Help Topic.
Adding a New Time
Adding a new employee time with the Edit Times screen is pretty easy. Just click the name of the employee that you want to add a new time for. Once you've done that click the Add New Time link and the Add New Time screen (shown below) will popup.

The Add Time Screen - Click to Enlarge
It's a pretty simple matter to choose a clock in and out time and date from this screen. Notice how you're told what the elapsed period between the two times is. You'll find that the screen has some safety checks incorporated in it to stop you from making mistakes like setting the clock out time before the clock in time or setting the duration of a clock period to more that one day. We're going to classify this new time as a sick day, so we'll choose Sick from the Classification dropdown box. Note that you can select Vacation, PTO, or Other from this box too.

Entering a Note - Click to Enlarge
Here we've entered a note to help out the payroll supervisor when he/she looks at the Online Time Clock MTS payroll reports to process wages for the week. Once we're happy with the new time we just need to click the Save button to add the time.
Conclusions
Based on this blog entry and the two about Vacation Accruals and Sick Time Accruals you should now know how to setup Online Time Clock MTS accruals and record both sick and vacation time. The next step in the process is to report on this recorded time, but that is a subject for another day.
Posted by markn at 2:27 PM
Setting Up Sick Time Accruals in Online Time Clock MTS
Online Time Clock MTS allows you to setup one or many complex (or simple) sick accrual schemes which can be applied to your employees. This can take all of the calculation complexity out of your hands and help to minimize payroll errors at the same time as decreasing unproductive time spent on administrative tasks. This blog article will take you through the process of configuring Online Time Clock MTS to do your sick accrual calculations for you.
Add an Employment Type
Sick accruals are setup on an employment type basis, employment types are then assigned to employees. This method gives you a great deal of flexibility. For example, you could define one employment type (and sick accrual scheme) to cover an entire group of employees or create an employment type per employee and have different accrual schemes per employee. The first step in the process is to add a new employment type. To do this log into Online Time Clock MTS as the account administrator or a location administrator and then go to the Manage Data->Manage Employment Types screen.
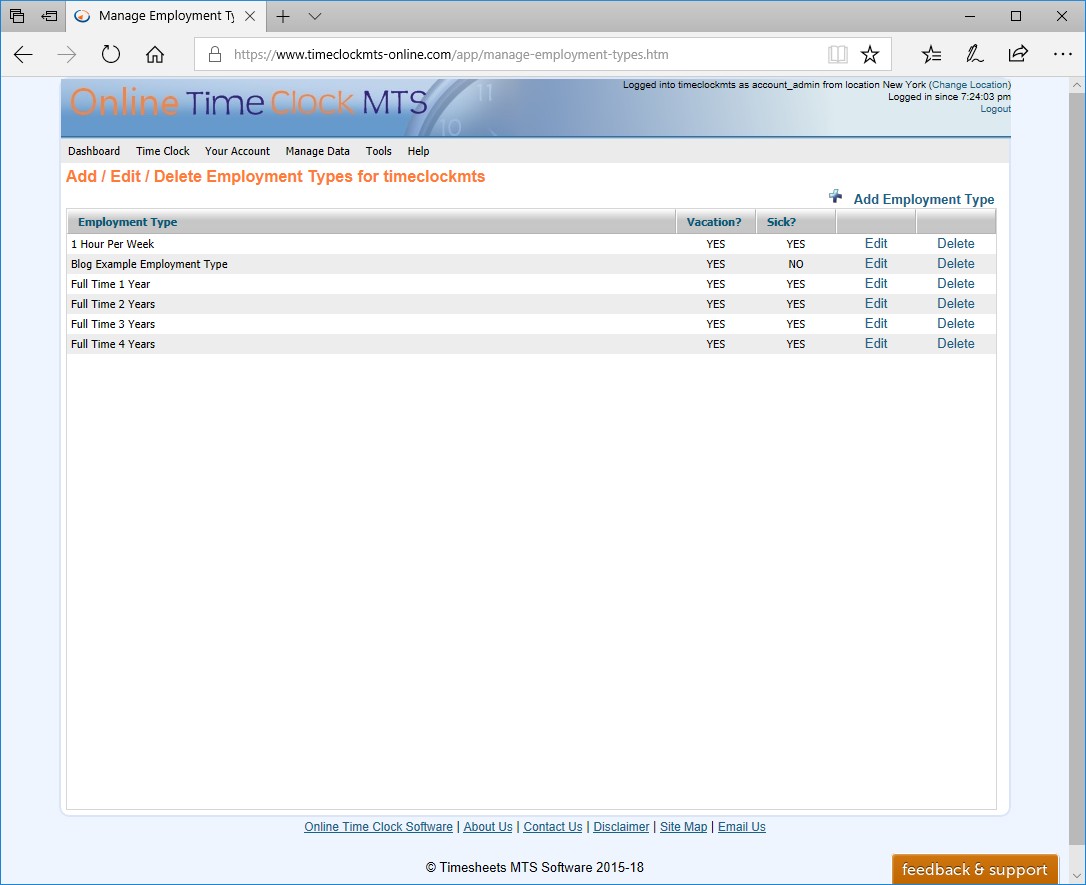
The Manage Employment Types Screen - Click to Enlarge
Click the Add Employment Type link to add a new employment type, you'll be shown the screen below. Give the new employment type a name.
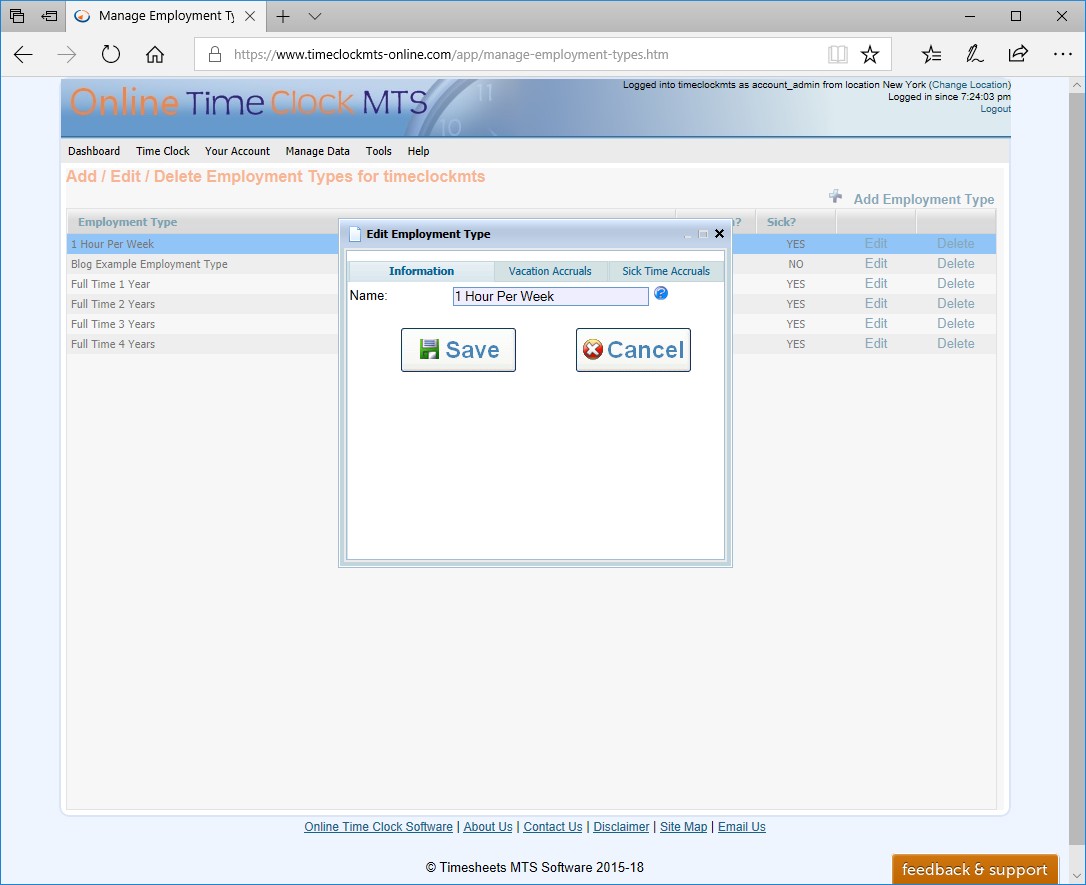
The Employment Type Information Screen - Click to Enlarge
Now click on the Sick Accruals tab and you'll be shown the screen below.
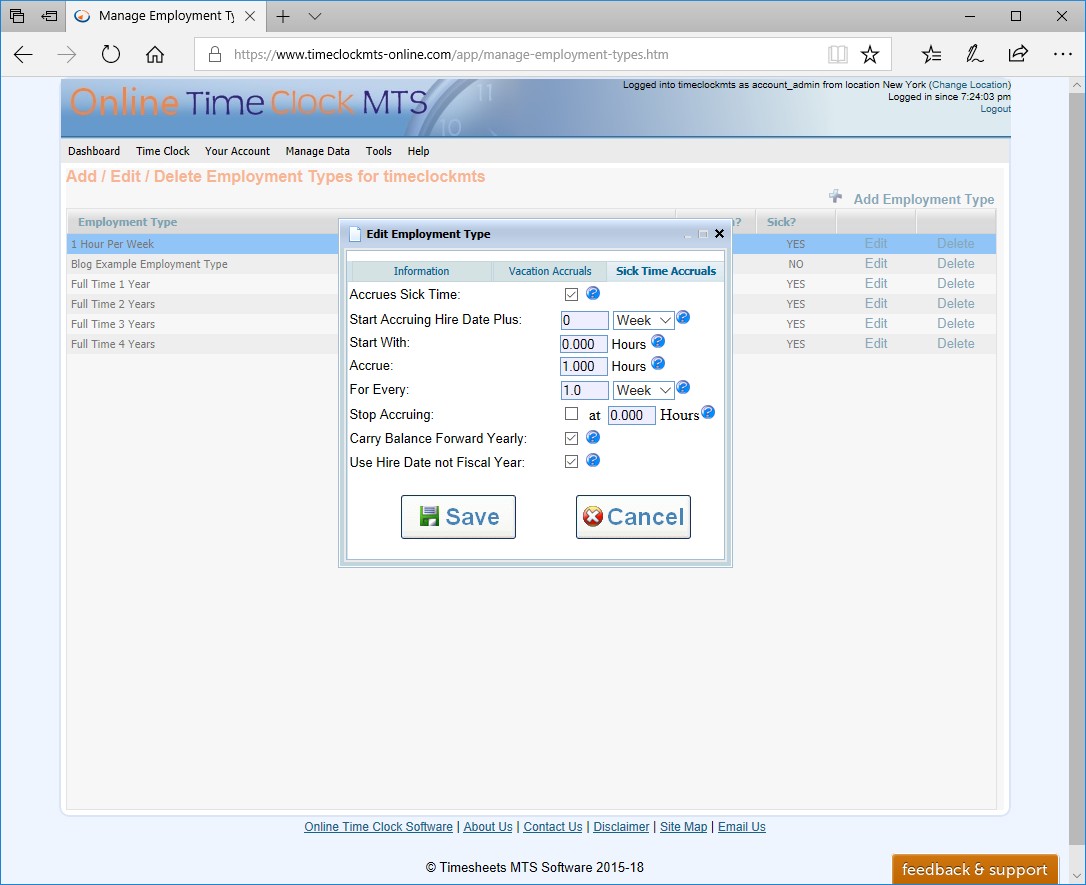
The Employment Type Sick Accruals Screen - Click to Enlarge
It's worth spending some time taking a look at this screen. There's several settings you can play with to have Online Time Clock MTS calculate your employee sick accruals.
- Accrues Sick Time - this box must be checked for this employment type to accrue sick time. Each employee must also have the Accrues Sick Time setting checked on the employee payroll information screen.
- Start Accruing Hire Date Plus - you can use this setting to apply a delay to the start of sick accruals. It's pretty common to delay new employees from getting sick time for a month or even three months after they start work so you'd set your delay here.
- Start With - this field can be used to set a sick starting balance. This could be used for employees who get their leave credited in advance of the time they work to accrue it.
- Accrue - the number of hours the employee will accrue for each time unit which is set in the For Every setting which we'll discuss next.
- For Every - the time unit at which sick time will accrue. When the units are set to hours sick time will accrue in units of hours worked by the employee. When the units are set to weeks sick time will accrue in elapsed 7 day weeks since the employee was hired (or the beginning of the fiscal year) regardless of hours worked. When the units are set to months sick time will accrue in calendar months since the employee was hired (or the beginning of the fiscal year) regardless of hours worked. It is worth noting that Online Time Clock MTS will only accrue sick time in whole units, so if your accrual period is set to 2 months it will only accrue time for a complete two month period (ie there are no partial units such as 1.5 months).
- Stop Accruing - if you apply an upper limit for sick accruals then you can check this box and set a limit in hours. It's not unusual for a company to limit their sick liability by applying an upper limit on accrued time.
- Carry Balance Forward Yearly - if this box is checked the sick balance will rollover from one year to the next (the year being either the fiscal year or the anniversary of the employee hire date). If this is not checked then the employee sick balance will reset yearly.
- Use Hire Date not Fiscal Year - if this box is checked then the rollover date used will be the anniversary of the employee hire date. This setting only takes effect if the Carry Balance Forward Yearly setting is checked.
Setting up an Example Sick Accrual Scheme
Now we'll go ahead an define an example sick accrual scheme for the purposes of this blog article. Firstly make sure to check the Accrues Sick Time setting and then enter the settings as shown in the image below.

Sick Accrual Example - Click to Enlarge
In this example:
- The employee does not start accruing sick time until 4 weeks after they are hired.
- The employee starts with a zero sick balance.
- The employee accrues 13.333 hours for every elapsed calendar month. The results in 160 hours of sick being accrued each year or four full 40 hour work weeks.
- The maximum accrual balance is 320 hours or two full years of sick time.
- Sick time will continue to accrue from one year to the next without the balance being reset.
- The employee hire date is used as the basis for accrual calculations rather than the fiscal year.
Setup the Employee to Accrue Sick Time
The next (and final) step in the process of setting up sick accruals is to configure each employee to use our new employment type and then specify that the employee can accrue sick time. We do this by going to the Manage Employees screen and then editing the employee and setting the employment type on the employee information tab, this is shown in the image below.
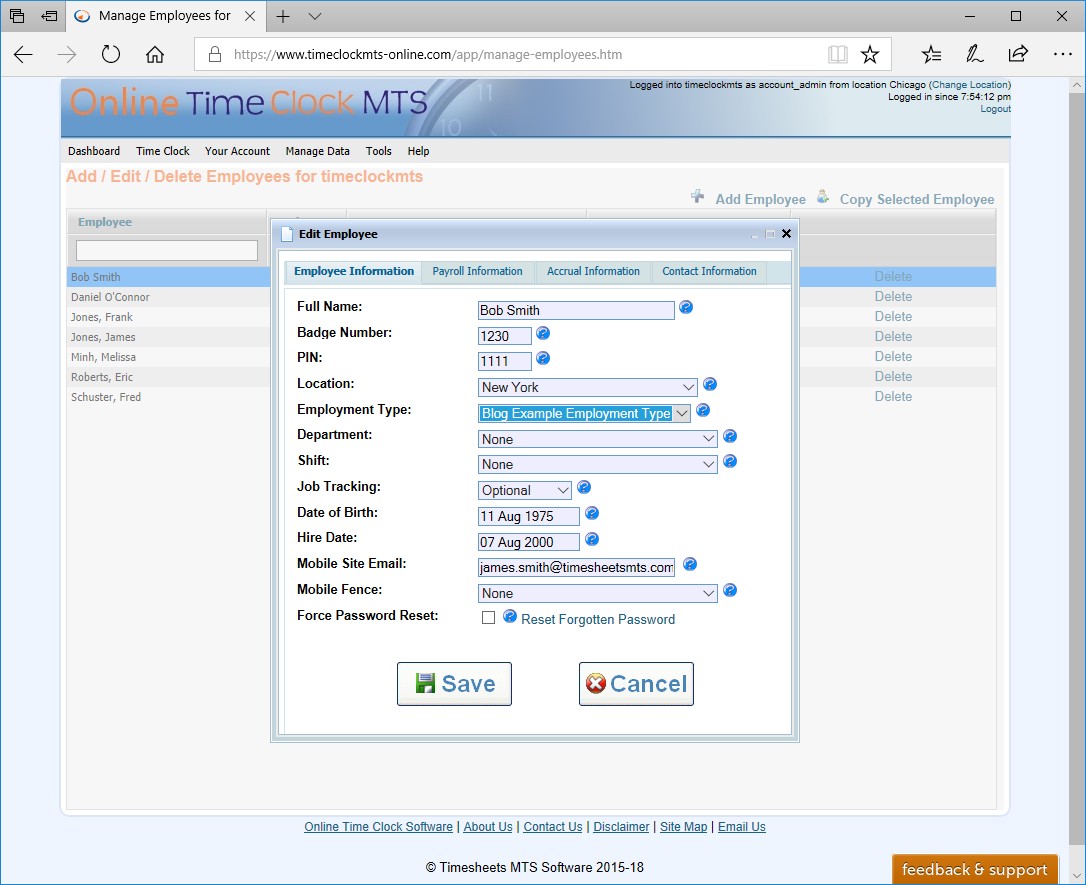
Setting the Employment Type - Click to Enlarge
Once we've set the employment type click the Payroll Information tab and check the Accrues Sick Time checkbox. This is shown in the image below.
Employee Payroll Information - Click to Enlarge
All we need to do now is click Save to save the changes and our employee is now setup to accrue sick time. There are a couple of settings on the Employee Payroll Information screen that can also affect the sick accrual calculations. The first, the Override Accrual Start Date setting allows you to specify a date from which accrual calculations will start. This is useful for bringing existing employees with established accrual balances into Online Time Clock MTS. The second setting, Sick Time Starting Balance is also useful for this purpose. This starting balance is cumulative with the starting balance of the employment type.
Conclusions
I've taken you through the process of setting up Online Time Clock MTS to perform your sick accrual calculations for you, there's still the matter of actually recording the sick time taken and then reporting on this. These are subjects for some follow up blog articles that will be available in the next few days.
Posted by markn at 1:45 PM
Setting Up Vacation Accruals in Online Time Clock MTS
Online Time Clock MTS allows you to setup one or many complex (or simple) vacation accrual schemes which can be applied to your employees. This can take all of the calculation complexity out of your hands and help to minimize payroll errors at the same time as decreasing unproductive time spent on administrative tasks. This blog article will take you through the process of configuring Online Time Clock MTS to do your vacation accrual calculations for you.
Add an Employment Type
Vacation accruals are setup on an employment type basis, employment types are then assigned to employees. This method gives you a great deal of flexibility. For example, you could define one employment type (and vacation accrual scheme) to cover an entire group of employees or create an employment type per employee and have different accrual schemes per employee. The first step in the process is to add a new employment type. To do this log into Online Time Clock MTS as the account administrator or a location administrator and then go to the Manage Data->Manage Employment Types screen.
The Manage Employment Types Screen - Click to Enlarge
Click the Add Employment Type link to add a new employment type, you'll be shown the screen below. Give the new employment type a name.
The Employment Type Information Screen - Click to Enlarge
Now click on the Vacation Accruals tab and you'll be shown the screen below.

The Employment Type Vacation Accruals Screen - Click to Enlarge
It's worth spending some time taking a look at this screen. There's several settings you can play with to have Online Time Clock MTS calculate your employee vacation accruals.
- Accrues Vacation Time - this box must be checked for this employment type to accrue vacation time. Each employee must also have the Accrues Vacation Time setting checked on the employee payroll information screen.
- Start Accruing Hire Date Plus - you can use this setting to apply a delay to the start of vacation accruals. It's pretty common to delay new employees from getting vacation time for a month or even three months after they start work so you'd set your delay here.
- Start With - this field can be used to set a vacation starting balance. This could be used for employees who get their leave credited in advance of the time they work to accrue it.
- Accrue - the number of hours the employee will accrue for each time unit which is set in the For Every setting which we'll discuss next.
- For Every - the time unit at which vacation time will accrue. When the units are set to hours vacation time will accrue in units of hours worked by the employee. When the units are set to weeks vacation time will accrue in elapsed 7 day weeks since the employee was hired (or the beginning of the fiscal year) regardless of the hours worked. When the units are set to months vacation time will accrue in calendar months since the employee was hired (or the beginning of the fiscal year) regardless of the hours worked. It is worth noting that Online Time Clock MTS will only accrue vacation time in whole units, so if your accrual period is set to 2 months it will only accrue time for a complete two month period (ie there are no partial units such as 1.5 months).
- Stop Accruing - if you apply an upper limit for vacation accruals then you can check this box and set a limit in hours. It's not unusual for a company to limit their vacation liability by applying an upper limit on accrued time.
- Carry Balance Forward Yearly - if this box is checked the vacation balance will rollover from one year to the next (the year being either the fiscal year or the anniversary of the employee hire date). If this is not checked then the employee vacation balance will reset yearly.
- Use Hire Date not Fiscal Year - if this box is checked then the rollover date used will be the anniversary of the employee hire date. This setting only takes effect if the Carry Balance Forward Yearly setting is checked.
Setting up an Example Vacation Accrual Scheme
Now we'll go ahead an define an example vacation accrual scheme for the purposes of this blog article. Firstly make sure to check the Accrues Vacation Time setting and then enter the settings as shown in the image below.

Vacation Accrual Example - Click to Enlarge
In this example:
- The employee does not start accruing vacation time until 4 weeks after they are hired.
- The employee starts with a zero vacation balance.
- The employee accrues 13.333 hours for every elapsed calendar month. The results in 160 hours of vacation being accrued each year or four full 40 hour work weeks.
- The maximum accrual balance is 320 hours or two full years of vacation time.
- Vacation time will continue to accrue from one year to the next without the balance being reset.
- The employee hire date is used as the basis for accrual calculations rather than the fiscal year.
Setup the Employee to Accrue Vacation Time
The next (and final) step in the process of setting up vacation accruals is to configure each employee to use our new employment type and then specify that the employee can accrue vacation time. We do this by going to the Manage Employees screen and then editing the employee and setting the employment type on the employee information tab, this is shown in the image below.
Setting the Employment Type - Click to Enlarge
Once we've set the employment type click the Payroll Information tab and check the Accrues Vacation Time checkbox. This is shown in the image below.
Employee Payroll Information - Click to Enlarge
All we need to do now is click Save to save the changes and our employee is now setup to accrue vacation time. There are a couple of settings on the Employee Payroll Information screen that can also affect the vacation accrual calculations. The first, the Override Accrual Start Date setting allows you to specify a date from which accrual calculations will start. This is useful for bringing existing employees with established accrual balances into Online Time Clock MTS. The second setting, Vacation Time Starting Balance is also useful for this purpose. This starting balance is cumulative with the starting balance of the employment type.
Conclusions
I've taken you through the process of setting up Online Time Clock MTS to perform your vacation accrual calculations for you, there's still the matter of actually recording the vacation time taken and then reporting on this. These are subjects for some follow up blog articles that will be available in the next few days.
Posted by markn at 10:32 AM
November 5, 2010
Adding a Single Time on the Edit Times Screen
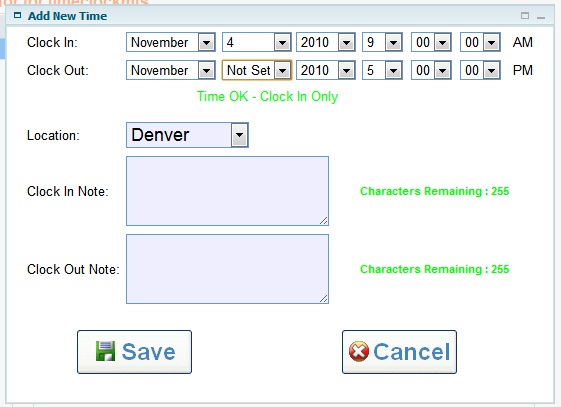
Adding a Single Time on the Edit Times Screen
An Online Time Clock MTS user has just asked an interesting question about adding a single time on the Edit Times screen. I assumed this meant either adding a single clock in (if an employee had forgotten to clock in for the day) or a single clock out (if the employee had forgotten to clock out when they'd gone home for the day). Here's the question I got:
Is there a way to add just one punch to a user? It seems like all it allows is to add BOTH a clock in and clock out time, but it does not allow ONLY a clock in time. In other words, if a employee missed a punch, how do I enter?
It's a good question and one worthy of a reply. Here's my answer (and the attached image is the one shown above):
You can add a single clock in on the Edit Times screen by adding a new time setting the Clock Out Day to Not Set. You can add a clock out (to match an existing clock in) by selecting the clock in from the edit times list and then setting the clock out time.I've attached an image to this email to show you what adding a single time looks like.
Posted by markn at 7:57 AM
Setting AM/PM on Edit Times Screen
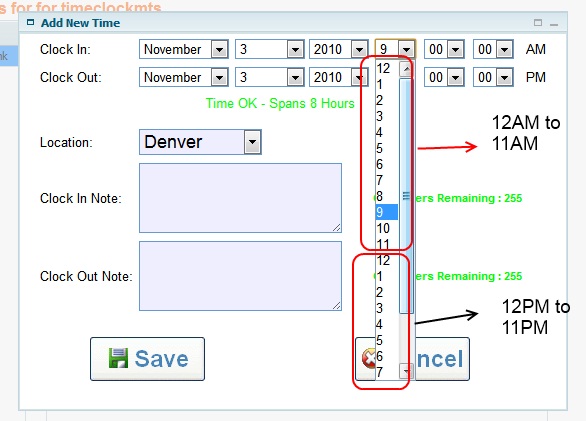
Setting Times to AM or PM on the Edit Times Screen
I had a great question from an Online Time Clock MTS user yesterday wondering how to set a time to AM or PM on the Edit Times screen. Here's the question:
The example is that I have an employee who clocked in at 8:30:00 am and did not clock out. When I attempt to change the clock out time to 4:30:00 pm I am not able to change the AM to PM and instead had to make it 11:30:00 am and make a note to add 5 hours to his payroll (4:30-11:30= 5 hours). I have tried highlighting the AM and changing it to PM but can't get anything to make it change.
Here's my reply (and the image I refer to is shown above):
If you click on the hours drop down on the Edit Times you'll note that the hours run from 12 though 11 twice, if you pick an hour in the second lot of 12 then this is the PM times, in the first lot of 12 it is the AM time. So in your example rather than setting the hour to 4 from the first lot of 12 hours set it to 4 from the second lot of 12 hours, and you'll see that the time changes to PM. Probably not the best explanation in the world so I've attached an image to this email that I hope makes this clearer.
Posted by markn at 7:50 AM
September 13, 2010
Online Time Clock MTS Locations Animated Tutorial Posted
One of the more difficult concepts for the new user of Online Time Clock MTS is that of Locations. I've had a couple of attempts at explaining exactly what a Location is including a blog entry titled rather imaginatively What is an Online Time Clock MTS Location and touched on the concept of Locations in the help file topic Managing Locations. However, given that Locations are such an important subject I thought it worthwhile to create an animated tutorial to go along with all the other Online Time Clock MTS Tutorials. This tutorial is devoted specifically to the topic of Locations. So if you're new to Online Time Clock MTS (or just fuzzy about what a Location is) then please take a look at the Online Time Clock MTS Locations Animated Tutorial.
Posted by markn at 3:32 PM
April 24, 2010
What is an Online Time Clock MTS Location?
A location is used to define each physical location that you plan to have your employees clocking in and out from. So, if you're a retailer and have multiple stores then you might define one location for each store to track your time and attendance in more detail. One of the most powerful things about locations is that each location can have a different time zone. This is extremely useful because each of your geographically separate operations can use Online Time Clock MTS to track your employee's time and attendance data regardless of what region or even country they are in. The timezone setting for each location is used to determine the local time when an employee clocks in or out. There's no reliance on your web browser, your computer, or anything else for precise times. They are 100% accurate and tamper proof obtained directly from the Online Time Clock MTS webserver. Time clock fraud is a thing of the past.
Something to bear in mind is that when Online Time Clock MTS becomes a commercial product then there will be an additional charge for each location after the first one that you want to use. Of course, you can just use a single location and Online Time Clock MTS wont bother you with anything about locations after you first configure your Online Time Clock MTS account.
Posted by markn at 8:52 AM
